The Machine
One faceplate, every function a button press away. This chapter walks the whole machine section by section, then lists every item in the Setup, Disk, MIDI and Sample menus with the screens they show.
The window
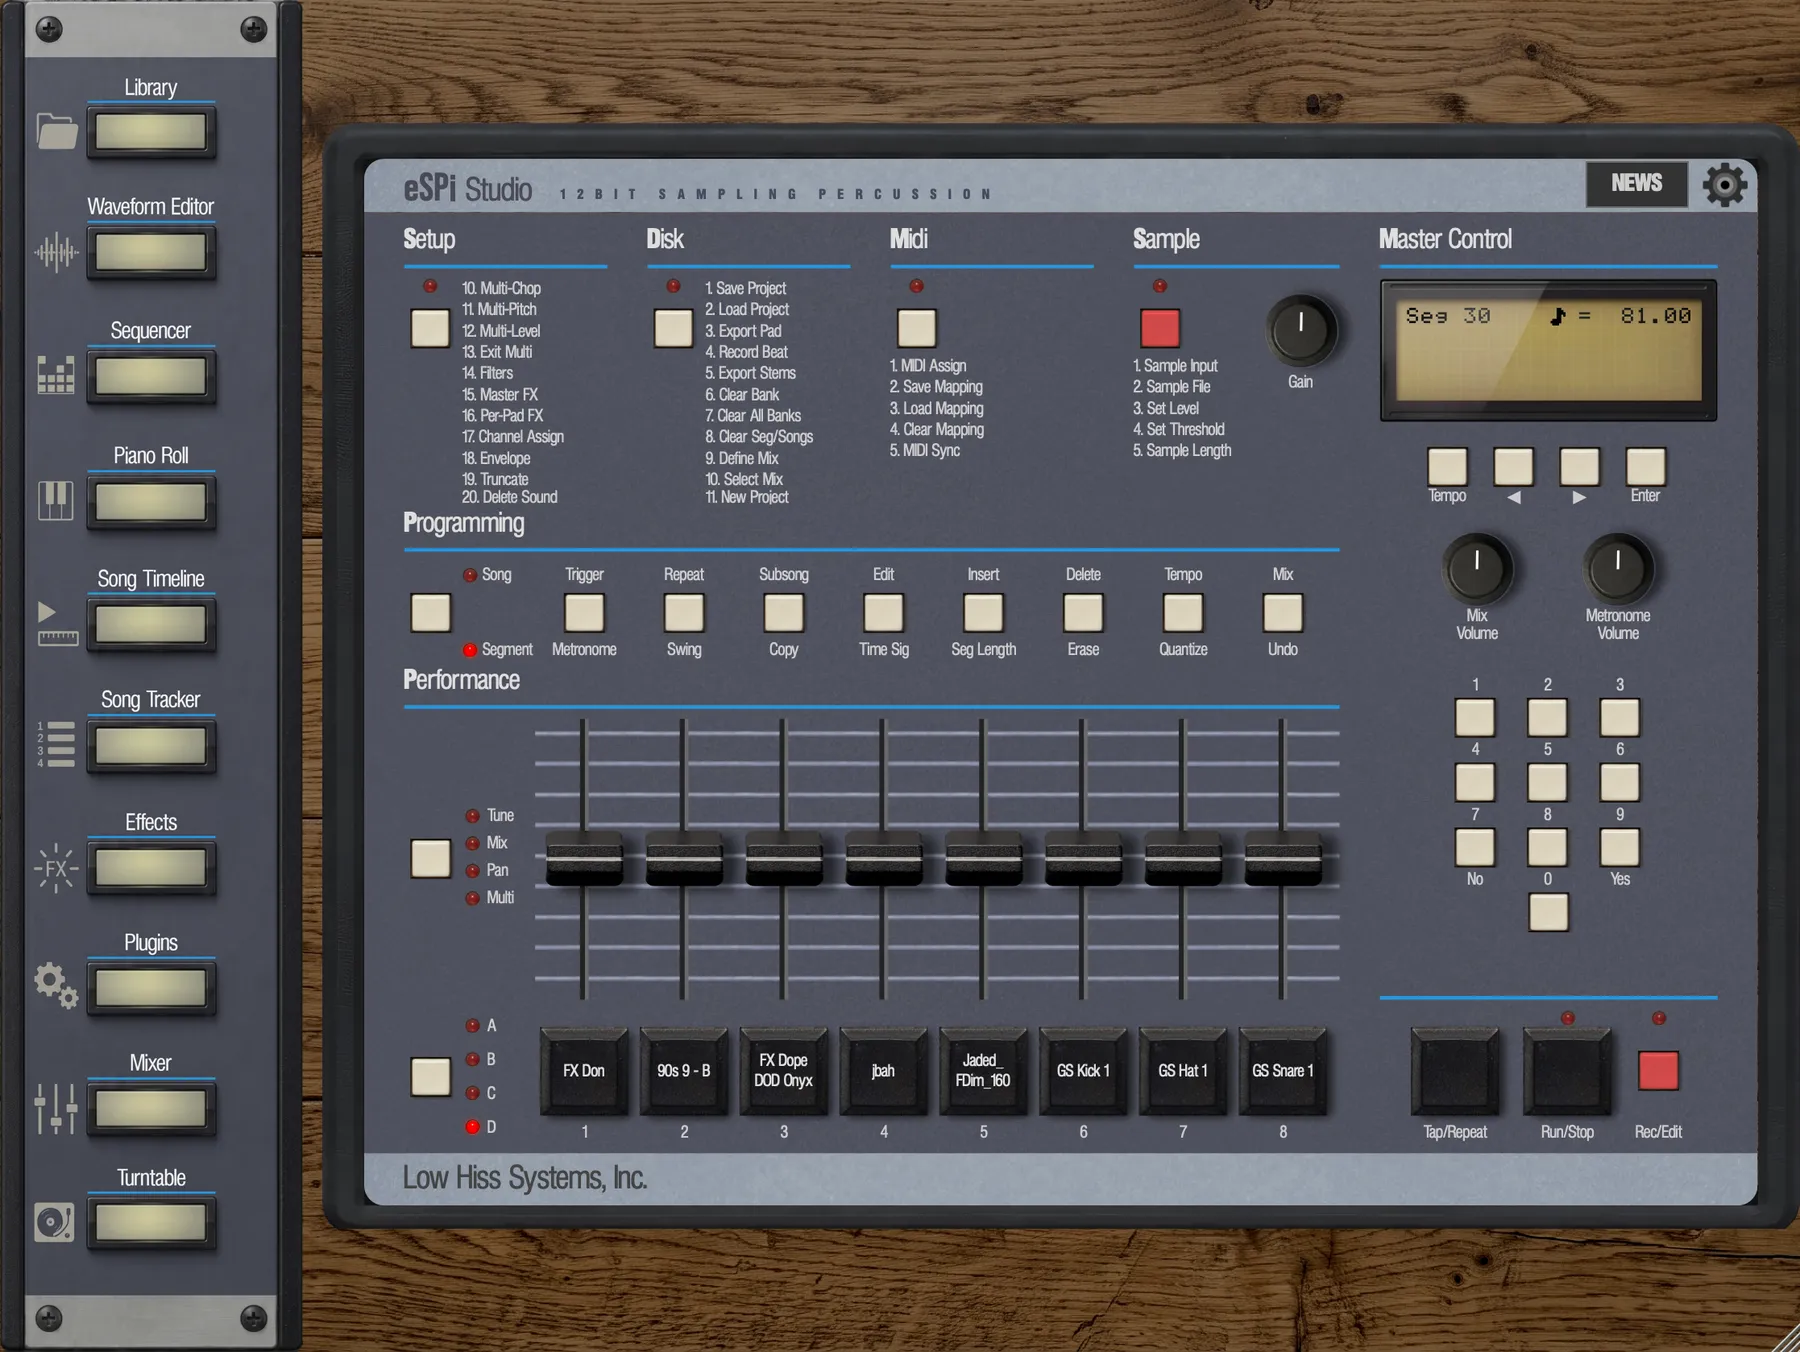
The eSPi window holds two things: the sidebar down the left edge, which opens the full-screen views, and the machine itself. The machine is always centred and scaled in proportion, never stretched, and sits on a backdrop you choose: Wooden Table (the default), Stone, Marble or an image of your own. Backdrops live in Settings › Appearance.
The header
Across the top of the machine runs the header: the eSPi logo with its 12BIT SAMPLING PERCUSSION tagline, and the Settings gear at the right. In a plugin on a computer, a menu button (three bars) sits left of the logo; see The plugin menu. Click the gear to open Settings. You can also reach it from the keyboard: press Tab to move focus to the gear, then Enter.
Just left of the gear sits the Store button (see The Store), and left of that the Help button, a question mark in a dark disc. It turns Help mode on and off. On a phone the Help switch lives elsewhere, as that section explains.
On iPad, iPhone and Android, which have no keyboard or Edit menu, Undo and Redo buttons sit in the same row, left of the Help button on a tablet. They work like Cmd/Ctrl + Z and Cmd/Ctrl + Shift + Z on desktop, and each greys out when there is nothing to undo or redo. See Undo. On a phone held upright the header also carries the views button and the SEG/SONG button (see On phones and tablets).
When SP-1200 Mode is on, the header also shows an SP1200 MODE chip and a memory meter. The meter reads Memory X.Xs, or Memory X.Xs/Y.Ys when free memory is fragmented, where Y is the longest single sample that still fits. Its bar fills as you use memory: green while there is plenty, amber when less than 10% of sound or sequence memory is left, red when the kit is over budget. The details are in The memory meter.
Help mode
Not sure what a control does? Turn on Help mode and eSPi tells you, without leaving the screen you are on. Click the Help button, the question mark in a dark disc, immediately left of the Store button in the header. From right to left, the header ends with the Settings gear, Store and Help.
Every view has the same button in its own header, immediately left of the cross that closes it: the Waveform Editor, the Sequencer Grid and the Piano Roll, the Song Timeline, the Song Tracker, the Mixer, the Effects Rack, the effect and instrument picker, a plugin's editor shown inside eSPi, the Sample Library, the Plugin Browser and Settings. On the Turntable it sits at the top left of the deck. They are all one switch: turn Help mode on anywhere and every Help button lights up.
- With a mouse. Rest the pointer on a control for about a third of a second and a bubble appears, with the control's name and one or two plain sentences about it. The text fits the screen and mode you are in: fader 1 reads one way in Mix and another in Tune. The bubble has an arrow pointing at the control, never covers it and stays inside the window. Controls keep working as usual while Help mode is on.
- On a touch screen (iPad, iPhone, Android). While Help mode is on, a tap shows the bubble instead of working the control. Tap somewhere else, or the same control again, to put the bubble away. Turn Help mode off to play again.
- On a phone. Held upright, the header has no Help button: choose Help mode in the views menu, where it is ticked while Help mode is on. Held sideways, where there is no header, a Help button sits left of the LCD.
Press Esc to turn Help mode off. Help mode is always off when eSPi starts: it is not remembered. A control that has no help text shows no bubble. On eSPi Essentials, the bubble of a feature that needs eSPi Studio ends with Available in eSPi Studio.
There is no Help button, and there are no bubbles, on the Store, the locked-view panel, the licence panel, the save-as dialog and News. Bubbles do not appear inside pop-up menus, drop-down lists, your operating system's dialogs or the windows of the plugins you host either.
The first time you start eSPi, a bubble points at the Help button to introduce it. Read the full manual opens this manual and Got it closes the bubble. It waits until any licence panel, News, the Store or a dialog is out of the way. It shows once per computer or device, which the standalone app and every plugin format share, and never comes back once you have pressed Got it or clicked the Help button.
The sidebar
The sidebar is your launcher for everything that does not fit on the faceplate. Each button opens a view, and only one full-screen view is open at a time.

| Button | Opens |
|---|---|
| Library Standalone | The Sample Library, as a panel docked beside the machine. See Sample Library. |
| Waveform Editor | The selected pad's sample, ready to trim and chop. See Waveform Editor. |
| Sequencer | The Sequencer Grid (drum grid). See Grid & Piano Roll. |
| Piano Roll | The Piano Roll for melodic parts. |
| Song Timeline | Songs as blocks on a timeline. See Songs. |
| Song Tracker | Songs as a table of steps. |
| Effects | The Effects Rack. See Effects. |
| Plugins Desktop | The Plugin Browser, docked beside the machine. See Hosting Plugins. |
| Mixer | The mixing desk. See Mixer & Outputs. |
| Turntable | The turntable deck. See The Turntable. |
Buttons light up as you hover over them. The Turntable button also stays lit while a record is spinning with its window closed, so you know the deck is still running. Library and Plugins don't cover the machine: they replace the sidebar with a docked panel, and closing the panel brings the buttons back. The Library button is hidden when eSPi runs as a plugin.
On eSPi Essentials the sidebar shows its eSPi Essentials artwork, which sets the eight eSPi Studio buttons apart from Library and Waveform Editor. A screen reader announces each of those eight with the lock, for example Mixer, locked, requires eSPi Studio. Clicking one opens the locked-view panel described in Locked views on eSPi Essentials, and the view itself stays closed. When eSPi Studio unlocks, the normal sidebar and names return at once, with no restart. To tidy the locked buttons away, turn on Hide locked views in Settings › Appearance: the sidebar disappears, the machine moves to the centre of the window, and Library and Waveform Editor sit as buttons in the footer.
On iPad the same buttons sit in a row in the footer instead, in this order: Library, Sequencer, Piano Roll, Waveform Editor, Song Timeline, Song Tracker, Effects, Turntable, Mixer. The round views button at the top left of the header, left of the eSPi logo, also opens them as a menu, as on a phone. On a phone held upright they are items in the header's views menu (see On phones and tablets). The Plugin Browser isn't available on mobile.
The faceplate, section by section
The faceplate follows the SP-1200's layout: menus along the top, the Programming and Performance sections in the middle, pads and transport along the bottom, and the Master Control column on the right.
Setup, Disk, MIDI and Sample
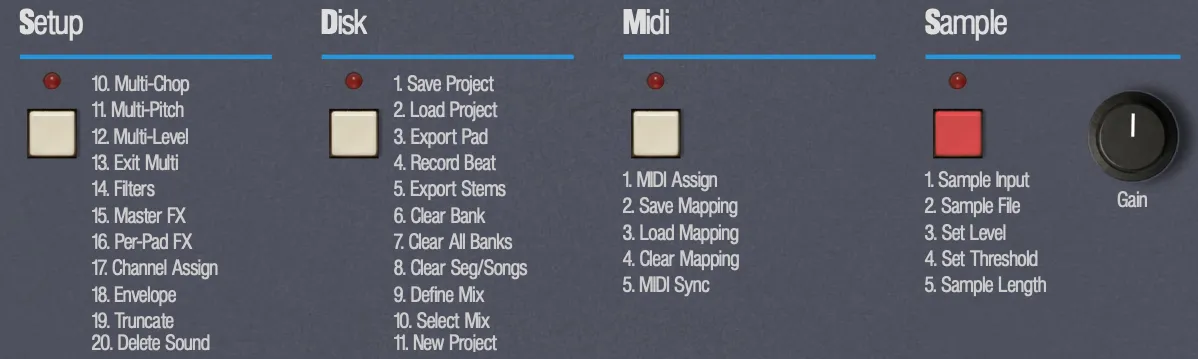
Each menu has a button with an LED above it; the Sample button is red. The LED lights while that menu is open, and only one menu can be open at a time. Under each button the faceplate prints the menu's items, and you can click any label to jump straight to that item. How the menus work is covered in The LCD and menus; every item is listed in the reference sections that follow it.
The Sample section also carries the Gain knob, the input gain for live sampling. It runs 0 to 127, with unity at the centre and about +6 dB at the top. More in Sample from input.
Programming

On the left is the Song/Segment button, with a Song LED above and a Segment LED below. It switches the machine between playing segments (patterns) and playing songs. Next to it are eight buttons, each with two labels. The lower label is what the button does normally. The upper label is its job in Song Edit, covered in Songs.
| Button | Lower label (normal) | Upper label (Song Edit) | Key |
|---|---|---|---|
| 1 | Metronome | Trigger | A |
| 2 | Swing | Repeat | S |
| 3 | Copy | Subsong | D |
| 4 | Time Sig | Edit | F |
| 5 | Seg Length | Insert | G |
| 6 | Erase | Delete | H |
| 7 | Quantize | Tempo | J |
| 8 | Undo | Mix | K |
What each button does when you are building a beat is the subject of Sequencing.
Performance
The Performance section is the mode button, four LEDs (Tune, Mix, Pan, Multi) and eight vertical faders numbered 1 to 8. Press the mode button (or Left Shift) to step the faders through Tune, Mix and Pan; each fader then controls the matching pad of the current bank. A cap label on each fader shows its current value, such as +3 or CENTER. The Multi LED only lights to tell you the current bank is in Multi-Mode. The faders also drive the Setup screens, such as Envelope and Filters. Everything the faders do to pads is in Pads & Banks.
Master Control
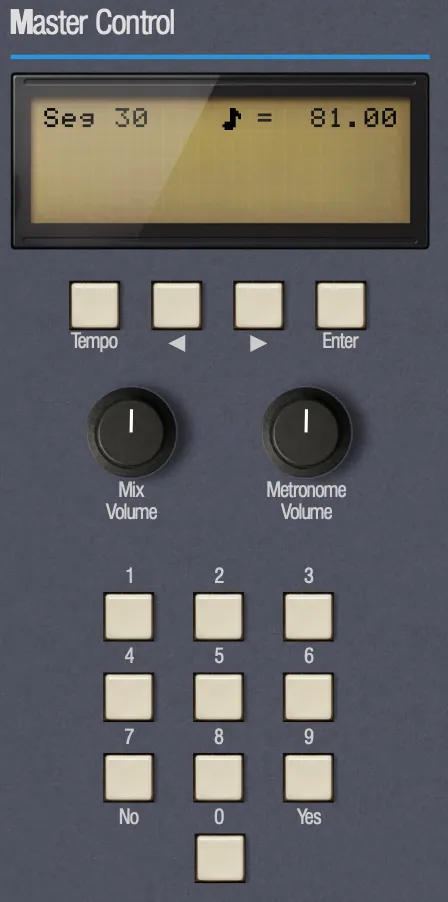
The right-hand column is where you read and steer the machine: the LCD, the navigation buttons, two volume knobs and the numpad.
 1
2
3
4
5
6
7
8
9
- LCD. Twenty characters by four lines. Its colour is amber by default; change it in Settings › Appearance.
- Tempo. Opens tempo entry, and gets you out of any menu.
- ◄ and ►. Step through values and menu items.
- Enter. Opens the highlighted item, and confirms.
- Mix Volume. Master output, 0 to 127. The centre is unity, the top is +12 dB and 0 is off.
- Metronome Volume. The click level, 0 to 127. See Metronome.
- Numpad. Digits 1 to 9 in phone layout, with 0 centred below.
- 7 is also No. It cancels yes/no questions.
- 9 is also Yes. It confirms, just like Enter.
While you drag Mix Volume, the LCD shows the gain live:
The Mix Volume readout while you turn the knob. At 0 it reads Output Gain: OFF.
Bank and pads

Left of the pads is the Bank button, with LEDs for A, B, C and D. Each press steps to the next bank. The eight pads show what is loaded on them: an empty pad shows its name (A1, B5 and so on), and a loaded pad shows the sample name, wrapped over up to three lines. A pad that plays a plugin instrument carries a blue INST badge. Everything about pads is in Pads & Banks.
Transport
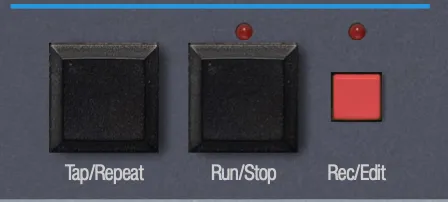
- Tap/Repeat
- Tap tempo on the tempo screen. Hold it with a pad for note repeat. Key: Right Shift.
- Run/Stop
- Plays the segment or song from the top, or stops and rewinds. Right-click it (long-press on touch) to panic: stop, rewind and silence every voice. Key: Space. Or hold Enter and press Run/Stop.
- Rec/Edit
- Arms recording in Segment mode, or opens Song Edit in Song mode. Key: Right Alt.
The Run/Stop and Rec/Edit LEDs always show what the engine is really doing. The transport is covered in full in Sequencing.
The footer
The strip along the bottom carries the Low Hiss Systems, Inc. name. On iPad, and on a phone held sideways that is too narrow for the sidebar, it also holds the view buttons that the sidebar holds on desktop. A phone held upright has no footer.
Working the controls
Every control behaves the same way wherever you meet it, on the faceplate or in a view.
- Faders
- Drag up and down. Double-click to reset to the default.
- Knobs
- Drag vertically, not in a circle. Double-click to reset.
- Buttons and labels
- Click. The pointer turns into a pointing hand over anything you can click.
- Touch
- Tap, drag and double-tap work the same way. Controls have enlarged touch areas, so you don't need to hit them dead centre.
The LCD and menus
The LCD is the machine's voice. Whatever you press, it tells you where you are and what the buttons will do next. Learning to read it, and to get back home from anywhere, is most of learning eSPi.
The home screen
The home screen shows the current segment or song and the tempo.
Segment mode and Song mode. While the transport runs, line 4 shows a progress bar through the segment's bars or the song's steps.
- ◄ and ► step the segment or song number, from 00 to 99.
- Two numpad digits jump straight to a number. After the first digit a cursor waits for the second.
- Song/Segment (or Caps Lock) switches between Segment mode and Song mode.
Setting the tempo
- Press Tempo (or =). A cursor blinks on the BPM.
- Type the tempo. If the first digit is 1 to 4 you type five digits, so 1 2 0 0 0 gives 120.00. If it is 5 to 9 you type four, so 9 0 0 0 gives 90.00. The tempo applies on the last digit.
- Press Tempo again to leave.
Some shortcuts: Enter finishes a short entry, so 8 2 Enter gives 82.00. ◄ and ► nudge the tempo by 1 BPM, repeating while held. Tapping Tap/Repeat on this screen sets the tempo by feel. The range is 30 to 400 BPM, or 40 to 240 in SP-1200 Mode, and the tempo can't be edited while eSPi follows external MIDI clock or your DAW. More in Tempo.
Moving through a menu
- Open the menu. Press Setup, Disk, Midi or Sample (or Q, W, E, R). The LED lights and the LCD shows the menu's question and range. Sample is the exception: it opens directly on its first item.
- Pick an item, any of three ways:
- Type its number on the numpad. The item opens as soon as the number is complete. Setup numbers have two digits (10 to 21); Disk, MIDI and Sample take one. Digits that can't make a valid number are ignored.
- Step through the items with ◄ and ►, then press Enter. Setup and Sample wrap around at the ends; Disk and MIDI stop.
- Click the item's label on the faceplate.
- Answer yes/no questions. When line 2 reads (yes/no), press 9 (Yes) or Enter to go ahead, or 7 (No) to cancel. Other digits are ignored.
- Leave. Press the same menu button again, or press Tempo.
The Setup menu, just opened. Type a number or start browsing.
Browsing with ◄ and ►. Line 4 shows the highlighted item.
Because Disk, MIDI and Sample take a single digit, items with two-digit numbers (Disk 10 to 15) and the MIDI items that aren't printed on the faceplate can't be typed. Reach them with ◄/►, or click the faceplate label where there is one.
Setup menu
Setup holds everything that shapes a pad's sound, plus Multi-Mode and SP-1200 Mode. Open it with Setup or Q, then type a two-digit number from 10 to 21.
| # | Item | What it does |
|---|---|---|
| 10 | Multi-Chop | Turns the bank into eight slices of one pad's sound. See Multi-Mode. |
| 11 | Multi-Pitch | Turns the bank into one sound at eight pitches. |
| 12 | Multi-Level | Turns the bank into one sound at eight levels. |
| 13 | Exit Multi | Turns Multi-Mode off for the current bank. |
| 14 | Filters | The pad's SSM2044, SP Channel and Multi filters. See Filters. |
| 15 | Master FX | The master effect chain on the LCD. See Effects. |
| 16 | Per-Pad FX | The selected pad's effect chain on the LCD. |
| 17 | Channel Assign | The pad's choke channel. See Channels and choke. |
| 18 | Envelope | The pad's attack, decay, sustain and release. See Envelope. |
| 19 | Truncate | The pad's start, end and loop points. See Truncate. |
| 20 | Delete Sound | Deletes the selected pad's sample. |
| 21 | SP-1200 Mode | Off, Original or Reissue. Not printed on the faceplate; type 21 or browse to it. |
Every Setup screen works on the selected pad, the last pad you pressed. Press another pad while a screen is open and the screen follows it. They also work on empty pads, except Truncate and Delete Sound. While you are in a Setup screen the Setup LED stays lit; press Setup to go back home, or press the Performance mode button to jump to Tune.
Browsing Setup
As you step through Setup with ◄ and ►, the items that open a screen ask first:
Items 14 to 19 ask before they open. Press 9 or Enter to go in.
The questions are Access Filters? (14), Access Master FX? (15), Access Per-Pad FX? (16), Assign Channels? (17), Access Envelope? (18) and Truncate Pad? (19). Items 10 to 12 show just their name and number while you browse, and open their own confirm screen when you choose them.
10–12 · Multi-Chop, Multi-Pitch, Multi-Level
Choose one and a confirm screen names the mode and the source pad. Press another pad to change the source, then 9 or Enter to turn it on, or 7 to cancel.
Multi-Pitch adds a scale picker on line 3. Choose it with ◄ and ►.
The Multi-Pitch scales are SP1200 Default, Chromatic, Major, Minor, Dorian, Maj Pentatonic, Min Pentatonic and Whole Tone. If you have edited this pad's Multi-Pitch before, Restore Edits comes first in the list. If the bank already has a Multi mode on, you get a warning instead:
Only one Multi mode per bank. Exit the current one first.
Multi-Pitch also works on a pad that hosts an instrument plug-in. Every pad of the bank then plays the source pad's instrument, at its root note shifted by that pad's pitch, so the eight pads play the notes of the scale. Hold several pads to play a chord. Retune a pad with the Tune fader to change its note, in whole semitones. A pad that hosts its own instrument plays the source's instrument while Multi-Pitch is on. What you record plays back as the same notes on the source pad after you exit Multi. Multi-Chop and Multi-Level still need a sample.
13 · Exit Multi
Press 9 or Enter to turn Multi-Mode off for the current bank. Your pads come back exactly as they were.
14 · Filters
Three pages, one per filter: the SSM2044 low-pass, the SP-1200 channel filter (SP Channel) and the Multi filter. ◄ and ► step through the pages, stopping at each end, and Enter switches the shown filter on or off without losing its settings. The faders set the values.
The three filter pages. Full details in Pads & Banks.
15–16 · Master FX and Per-Pad FX
These show an effect chain on the LCD, slot by slot: the master chain (15) or the selected pad's chain (16). You can add and remove effects and adjust them with the faders. The Effects Rack is the friendlier place to do the same thing; both are covered in Effects.
17 · Channel Assign
◄ and ► step the channel, wrapping from 32 back to 1. Or type two digits.
Pads on the same channel cut each other off. Channels run 1 to 32 (1 to 8 in SP-1200 Mode). The faders do nothing here. See Channels and choke.
18 · Envelope
Faders 1 to 4 set attack, decay, sustain and release, 0 to 31 each.
19 · Truncate
Start, end and loop, in samples. Faders 1 to 6 move them coarse and fine.
If the pad is empty, the LCD shows No sample on Pad A1 instead. Press Enter to cut the sample to its start and end for good:
9 or Enter cuts, 7 backs out. eSPi saves a checkpoint first, which you can restore from Disk 15.
The full Truncate workflow, including the fader layout, is in Loading & Sampling.
20 · Delete Sound
Deleting a sound asks twice, so a stray 9 can't wipe a pad.
The second question. Answer 9 or Enter to delete, 7 to keep the sound.
21 · SP-1200 Mode
◄ and ► cycle OFF, ORIGINAL and REISSUE. Tempo or Setup exits.
Turning SP-1200 Mode on starts a new project, and eSPi offers to save your current one first. What the mode changes is summarised in The Sound Engine and covered in full in SP-1200 Disks.
Disk menu
Disk is where projects, exports, mixes and SP-1200 disks live. Open it with Disk or W. Items 1 to 9 take a single digit; reach 10 to 15 with ◄ and ►, or click 10 and 11 on the faceplate.
| # | Item | What it does |
|---|---|---|
| 1 | Save Project | Saves the project. An untitled project asks for a name first. In a plugin, choose Save or Save to Disk.... See Save. |
| 2 | Load Project | A list of your projects. ◄ and ► move the cursor, 9 or Enter loads, 0 or Tempo exits. From Disk opens a file picker. |
| 3 | Export Pad | Exports the selected pad as an audio file. 0=Cancel while it runs. |
| 4 | Record Beat | Records the output to a file: confirm, then Press Play, and the LCD counts REC mm:ss. See Export audio. |
| 5 | Export Stems | Exports separate audio files. |
| 6 | Clear Bank | Clears the current bank. Asks Clear Bank A? with the current bank's letter. |
| 7 | Clear All Banks | Clears all four banks. Yes/no. |
| 8 | Clear Seg/Songs | Clears every segment and song. Yes/no. |
| 9 | Define Mix | Saves the current mix as a snapshot (Defined Mix N). See Mix snapshots. |
| 10 | Select Mix | ◄ and ► browse saved mixes, 9 or Enter applies, Tempo exits. |
| 11 | New Project | Starts a new, empty project, the same as File › New Project. See Projects & Export. |
| 12 | Import SP-1200 | Imports a .sp12 or .hfe disk. See Import a disk. |
| 13 | Export SP-1200 | Exports a .sp12 disk image. See Export to disk. |
| 14 | Export HFE | Exports an .hfe floppy image for a floppy emulator. |
| 15 | Undo History | Project checkpoints you can go back to. See Projects & Export. |
The faceplate prints items 1 to 11. A few of the screens you will see:
Items 6 to 10 ask yes or no when you land on them.
MIDI menu
The MIDI menu sets up controllers and clock. Open it with Midi or E. The faceplate prints every item. While MIDI Sync or a device list is on the LCD the MIDI LED stays lit, and pressing Midi again returns to the Segment or Song screen.
| # | Item | What it does |
|---|---|---|
| 1 | MIDI Assign | MIDI Learn: map a controller to any control. See MIDI Learn. |
| 2 | Save Mapping | Saves your controller mapping, then offers to export it to a file you choose. See Controller maps and sharing. |
| 3 | Load Mapping | Loads your saved mapping, or one from a mapping file (From file...). |
| 4 | Clear Mapping | Clears the live mapping of the controller you pick, after a yes/no. The saved file is kept. |
| 5 | MIDI Sync | Clock source and clock send. See MIDI clock. |
| 6 | Bluetooth MIDI | Pairs a Bluetooth MIDI device. Only shown where Bluetooth MIDI is available. See Bluetooth MIDI. |
Enter moves between the two rows, ◄ and ► change the value. In a plugin the source reads Source: Host, because your DAW owns the clock.
Sample menu
The Sample menu is how sound gets into eSPi from the outside world. Open it with the red Sample button or R. Unlike the other menus it opens straight on its first item.
◄ and ► change the item, Enter opens it.
| # | Item | What it does |
|---|---|---|
| 1 | Sample from Input | Records from your audio input onto the selected pad. Printed on the faceplate as Sample Input. See Sample from input. |
| 2 | Sample from File | Samples an audio file through the same input stage. Printed as Sample File. |
| 3 | Set Level | Sets the input level. |
| 4 | Set Threshold | Sets the level that starts a threshold recording. |
| 5 | Sample Length | Sets a fixed recording length, or Free. |
The whole sampling workflow is in Loading & Sampling.
On phones and tablets
On iPad, on desktop and inside a plugin, eSPi shows the full machine described above. On iPad the view buttons move from the sidebar to the footer. An iPhone Duo works like an iPad when it is unfolded and like a phone on its cover screen, and eSPi switches between the two as you open or close it.
Turn a phone sideways (an iPhone, or an Android phone narrower than 600 dp) and eSPi switches to a compact machine built to fit the screen:
- The header is hidden, so a gear beside the Master Control title opens Settings, with the Undo and Redo buttons just left of it. A Help button sits left of the LCD (see Help mode).
- The printed menu item lists are hidden. The menu buttons and the LCD work as usual.
- The Mix Volume and Metronome Volume knob row is hidden.
- The faders are shorter.
- The machine stays clear of the notch and the home bar.
Hold the phone upright and eSPi rebuilds the machine as one tall column, top to bottom:
- The header. The eSPi logo, the round views button, Undo and Redo, the SEG/SONG button and the Settings gear. The views button opens a menu of the full-screen views: Sequencer, Piano Roll, Waveform Editor, Song Timeline, Song Tracker, Mixer, Effects, Turntable and Library. The SEG/SONG button switches between Segment and Song mode, like the Song/Segment button in Programming, and the LED on its left (SEG) or right (SONG) shows which one is on. The views menu also holds Help mode (see Help mode).
- The menus and the LCD. Setup and Disk stand to the left of the LCD, Midi and Sample to its right. Tempo, ◄, ► and Enter sit under the LCD, and under them two knobs: Volume (Mix Volume) and Metronome (Metronome Volume). The Sample Gain knob, Gain, sits under the Sample button. The printed menu item lists are hidden.
- Programming. The eight programming buttons, across the full width.
- Performance. The eight faders become eight knobs in two rows of four. Drag a knob up or down. Each knob is labelled with what it controls on the current screen, or with its fader number.
- The pads, in two rows of four.
- The bottom row. The Bank button with its A to D LEDs, the Tune/Mix button with its Tune, Mix, Pan and Multi LEDs, then Tap/Repeat, Run/Stop and Rec/Edit.
There is no room for the numpad, so it pops up over the knobs whenever the LCD is waiting for a number, for example after you press Setup, and closes again when it is done. Tap the cross to put it away, and tap the LCD to bring it back or hide it at any time. In the popup, 7 is also No and 9 is also Yes.
The SP-1200 Mode memory meter is hidden in this layout. The full-screen views open turned on their side, filling the screen: turn the phone sideways to read them, and they straighten up. The Library covers the top of the screen and leaves the pads and the transport visible below it, so you can still drag a sound onto a pad.
Touch gestures, such as long-pressing a pad for its menu, are listed in Shortcuts & Gestures.
The standalone menu bar
The standalone app uses your operating system's own window and menus. On MacOS the menus sit in the system menu bar; on Windows and Linux they sit in the window, under the title bar. On MacOS the menus don't print shortcuts next to their items, but the shortcuts still work.
| Menu | Items |
|---|---|
| File | New Project (Cmd/Ctrl + N), New SP1200 Project (Original), New SP1200 Project (Reissue), Open Project... (Cmd/Ctrl + O), Open Recent. Import Legacy Project..., Import SP-1200 Disk.... Save Project (Cmd/Ctrl + S), Save Project As... (Cmd/Ctrl + Shift + S), Save as SP1200 Disk (.sp12)..., Save as SP1200 Disk (.HFE).... Export Mixdown..., Export Stems..., Export Pad.... Load Sample... (onto the selected pad), Save State..., Load State..., and Quit (Ctrl + Q, Windows and Linux; on MacOS Quit is in the app menu). |
| Edit | Undo and Redo, each naming the action, and History, which lists past edits around a - Current - marker. Click any entry to jump straight to that point. It shows up to ten entries either side. |
| View | Toggle Fullscreen (F11); the full-screen views Drum Grid, Piano Roll, Waveform Editor, Song Timeline, Tracker, Turntable, Effects Rack and Mixer; and the side panels Plugin Browser and Sample Library. |
| Options | Settings... and Audio Device Setup..., your system's audio device dialog. MIDI devices are set up in Settings › MIDI instead. |
| Help | eSPi User Manual (opens this manual on low-hiss.com), News and About eSPi |
The keys for the View items are in Shortcuts & Gestures. Without an activated license, some File items are greyed out: the exports, saving to an SP-1200 disk, the imports, Save As, Load Sample and Save State.
The plugin menu
Inside a DAW there is no menu bar. On a computer, the menu button (three bars) at the top left of the header, left of the eSPi logo, opens the same menus instead: File, Edit, View, Options and Help, with their submenus. Save Project As... opens a file chooser. Items a plugin can't use are left out: Quit, Toggle Fullscreen and Audio Device Setup.... Shortcut hints are left out too, since most of those keys belong to the host. See eSPi in Your DAW.
About eSPi
Choose Help › About eSPi in the standalone to see which version you are running. The About box shows the eSPi wordmark and tagline, the version (for example Version 3.0.0), a short description of the machine, the version of JUCE it was built with, and the trademark notice. Close it with OK or Escape. Have the version number handy when you contact support.