Mixer & Outputs
The faders on the faceplate get you a long way. When you want EQ, compression, sub-groups, snapshots you can flip between, or stems on separate outputs, open the desk.
Open the mixer
- Click Mixer in the sidebar (the footer icon on iPad, and on phones without the sidebar; on a phone held upright, the header's views menu).
- In the standalone app, choose View › Mixer or press Cmd/Ctrl + M.
Close it with the cross at the top right or Esc. While it is open, Space starts and stops playback, and the pads still play from your computer keyboard, so you can mix with your hands on the beat.
The layout
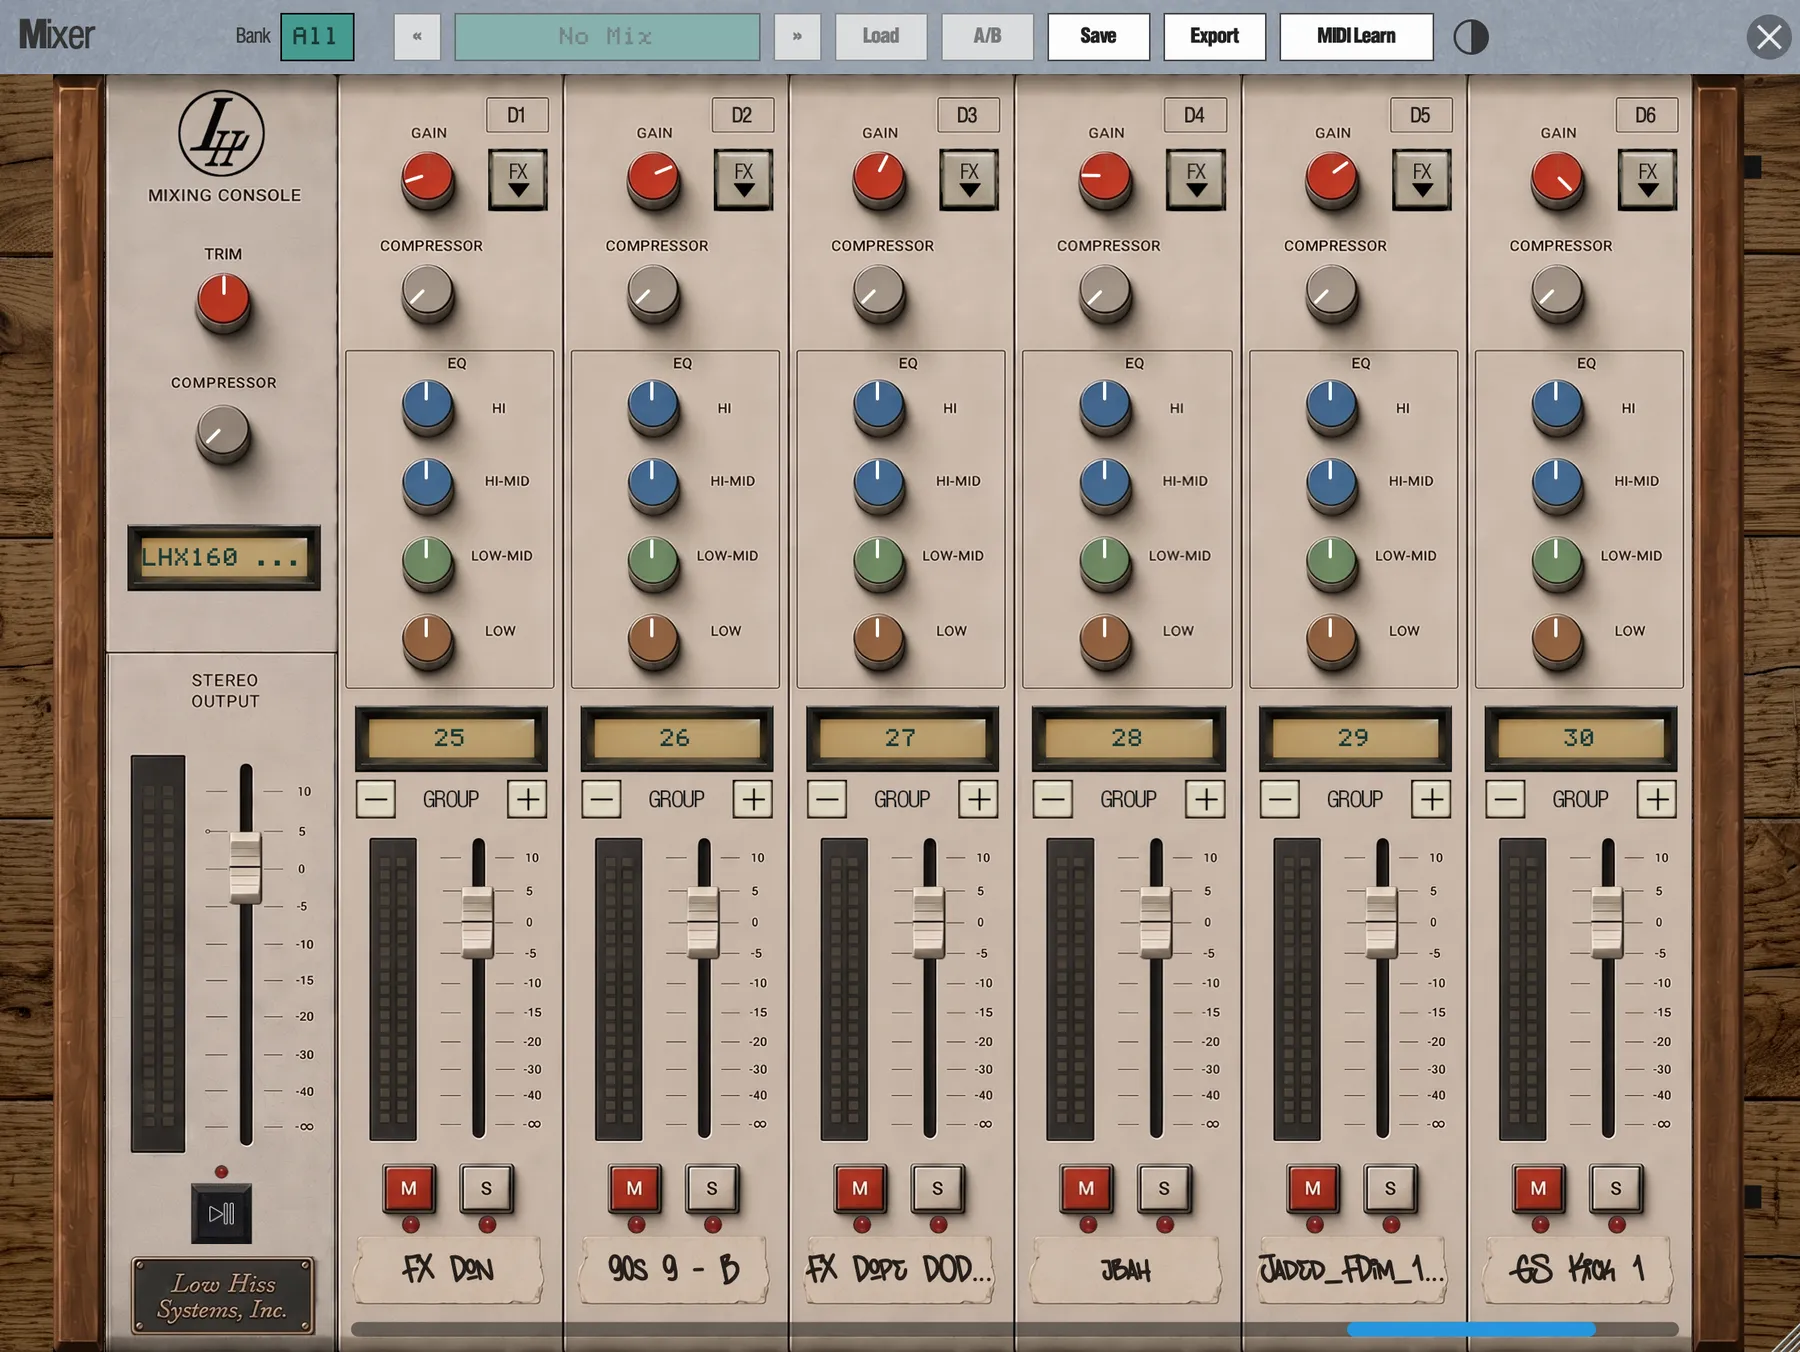 1
2
3
4
5
6
7
8
9
10
11
12
13
14
15
16
- Bank. Show one bank's strips, or all 32 pads.
- Mix selector. Step through saved Mixes; click the name to rename.
- Load, A/B, Save. Work with Mix snapshots.
- Export and MIDI Learn. Mixdown, and map the desk to a controller.
- Master Trim and Compressor.
- Master FX. The master effects chain at a glance.
- Master fader. The overall Mix Volume.
- Run/Stop. Starts and stops the sequencer.
- Gain. The pad's volume trim.
- FX. The strip's effects chain.
- Compressor. One knob, off at fully left.
- EQ. Hi, Hi-Mid, Low-Mid and Low.
- Group. Which group (bus) the pad feeds.
- Fader and meter.
- Mute and Solo.
- Tape label. The strip's name; click to rename.
Across the top runs the header. Below it the desk reads left to right: the master strip, which never scrolls away, then the group strips, then the pad strips.
Which strips you see
- A pad gets a strip once it holds a sample or a plugin instrument. With Multi-Mode active, only the source pad has a strip.
- A group gets a strip once two or more pads are in it. A group with a single pad only shows a strip if its settings or its effects are doing something.
- The Bank chip filters the pad strips: Bank A to Bank D, or All (32 pads).
- Groups shows only the group strips. It appears in the menu once the desk has at least one group strip, and like All it leaves the machine's bank alone. With no group left to show, the desk reads No group channels.
An empty project shows Load a sample onto a pad to see its channel. If the bank filter hides everything, the desk says so, for example No channels in bank B.
Scroll the desk
The desk scrolls one strip at a time. Use the mouse wheel or trackpad, drag the desk background, or press ← →. Play a pad from another bank and the desk scrolls to it.
Pad and group strips
Pad strips and group strips share the same controls, top to bottom. A few behave differently on a group, noted below.
- FX
- Lists the strip's effects in chain order, plus Open Effects Rack. Choose a built-in effect to open the Effects Rack on that slot. Choose a plugin, listed by its own name, to open its editor.
- Gain
- On a pad, this is the pad's volume. It can only turn the pad down: fully clockwise is unity. On a group, it trims from −24 to +24 dB, default 0.
- Compressor
- A one-knob compressor. Fully left is off (the default); turn it up for more squash. The signal goes through the EQ first and then the compressor; set Mixer Order to Comp > EQ in Settings › Engine to compress first. The order applies to every strip.
- EQ
- Four bands, each ±12 dB, flat by default: Hi (shelf at 6 kHz), Hi-Mid (peak at 2.5 kHz), Low-Mid (peak at 400 Hz) and Low (shelf at 100 Hz).
- Group (pad strips only)
- The small LCD shows which group the pad feeds, with its name once you have named it (3 - Drums). Step with − and +, or click the LCD to pick any group from a colour-coded list. Once a pad is in a group, its strip takes on the group's colour.
- Tape label
- The strip's name. For a pad that is its own name, else the sample name, else the plugin instrument's name, else the pad number (C7). For a group it is Group 3 or the name you gave it. Click it to rename.
- M / S
- Mute and Solo. A lamp lights while the strip is muted. On a group, they act on every pad in the group: if not all members are muted, M mutes them all; if they all are, it unmutes them all. Solo works the same way, and a group shows as soloed if any of its pads is.
- Fader
- Printed from −∞ to +10 dB, with unity (0 dB) as the default. The last few pixels at the bottom snap to silence.
- Meter
- Reads −60 to 0 dBFS with a peak hold and a clip light that latches.
Group strips are tinted in their group colour and carry a printed G3-style legend so you can tell them from pad strips at a glance. Knobs sitting at their neutral setting are drawn dimmed, so you can see what has been touched.
Gestures
- Drag a knob up or down, or drag a fader.
- Double-click any knob or fader to reset it.
- The mouse wheel scrolls the desk; it never turns a knob by accident.
- Every change is undoable with Cmd/Ctrl + Z, and one drag is one undo step.
- ↑ and ↓ nudge the fader or knob you last clicked or dragged, by 1% of its travel per press; hold Shift for fine steps of 0.1%. Each press is one undo step. This works only while that strip is on screen.
The master strip
The master strip is the end of the line. It is simpler than the others:
- Trim and Compressor
- A gain trim and the one-knob compressor for the whole mix.
- FX LCD
- Shows the master chain as Saturation > Limiter, or ADD FX when it is empty. Click it for the same FX menu as the other strips.
- Fader
- The master Mix Volume, the same level as the Mix Volume knob on the faceplate.
- Run/Stop
- Starts and stops the song or segment.
- Meter
- As on the other strips.
The master has no Mute, Solo or tape label. It also has no EQ knobs.
Metering
Every strip, master included, has a meter from −60 to 0 dBFS with peak hold. When a strip clips, its clip light stays on until you clear it, so you can catch the one hit that went over while you weren't looking.
Click a meter for its menu:
- Sum / Left / Right
- Show both channels together, or one side.
- Post-fader / Pre-fader
- Post-fader (the default) shows what the strip sends on. Pre-fader shows the level after the strip's effects but before its fader, which is handy when a fader is pulled right down.
- Clear Clip
- Resets the clip light.
Working with groups
Groups are eSPi's buses. Send all your drums to one group and you get one fader for the kit, one effects chain to glue it, one key for a sidechain and one output for a stem. There are 32 groups, or 8 in SP-1200 Mode.
- On each pad strip you want in the group, click + or − until the group LCD shows the same number, or click the LCD and pick the group.
- As soon as two pads share a group, a group strip appears to the left of the pad strips.
- Click the group's tape label and give it a name, such as Drums. The pad strips' LCDs now read 3 - Drums.
- Click the group's FX button to add a group chain, for example a compressor to glue the kit. See Effects.
A group can also be the key for a Gate or Ducker (see Sidechain) and can be sent to its own output (see Outputs and routing).
Mix snapshots and A/B
A Mix is a snapshot of the whole desk: every level and mute, every strip's gain, EQ and compressor, the master level and all the effect chains. A project holds up to 99 Mixes. Use them to keep alternative balances, to compare ideas, and to change the mix between parts of a song.
- Save
- Stores the current desk as a new Mix called "Mix 1", "Mix 2" and so on, and selects it. The toast confirms Saved Mix 2. Save is dimmed when the desk is empty or all 99 Mixes are used. It does the same as Disk › 9 Define Mix on the faceplate.
- « »
- Choose which saved Mix is selected. This alone changes nothing you hear.
- Load
- Applies the selected Mix to the desk, replacing what is there. It is a single undo step. Load is dimmed while you are listening to B.
- A/B
- Flips between your live desk (A) and the selected Mix (B). The button reads B while you are comparing. Each press is one undo step.
- Mix name
- Click it to rename the selected Mix. It reads No Mix until you save one.
Mixes in a song
A step in a song can recall a Mix. During playback the desk and the effects switch to that Mix exactly at the step boundary, with no fade. Two things to know:
- A song step never changes the master level. Loading a Mix by hand does.
- Recalling a Mix sets anything it didn't capture back to neutral.
While such a step plays, the Effects Rack shows that Mix's chains read-only.
Export and MIDI Learn
Export opens a menu: Master Mixdown exports the stereo mix, like Record Beat on the Disk menu, and Stems exports stems, like Export Stems. On desktop you choose where to save first. On iPad and Android a save picker opens when the export finishes. See Projects & Export.
MIDI Learn lights amber while active. Click a knob, fader or button on the desk, then move a control on your MIDI controller. Desk mappings follow the strip position on screen, not a particular pad, so a controller laid out like a console stays laid out like one. Mappings save automatically. More in MIDI Learn.
Outputs and routing
Everything plays on the main stereo pair unless you say otherwise. Route a group to its own output and you can process it on an outboard chain, record it on its own track in your DAW, or print clean stems.
Group Routing
In Settings › Audio, Group Routing lists every group in use as a row, each with an output menu:
- Stereo pairs first: Out 1-2 (Main), then Out 3-4 and onwards.
- Then single mono outputs (Out 1, Out 2 and so on). Choosing a mono output sums the group to mono.
If the output you chose isn't available on the current audio device, the group plays on Main. Your choice is remembered and comes back when the device does. With no outputs at all, the section says No audio outputs available.
Both editions. Group Routing works in eSPi Essentials too. Without the Mixer, each pad plays in the group of its channel: a pad on channel 5 is in Group 05. Group Routing lists one row per channel in use, even when a single pad uses it, so you can send any channel to its own output.
- Routed Groups Stay in Main
- In Settings › Engine, on by default. A routed group is heard on Main and on its own output, so your main mix stays complete. Turn it off for clean stems, where each routed group plays only on its own output.
Routed outputs get the same SP output-stage colour as Main. The master effects chain and the metronome are on Main only. Effect tails follow the group to its output.
Multiple outputs in the standalone app Standalone
The standalone app can open up to 64 outputs on your audio interface. When the device has four or more, Settings › Audio also shows Main Output, which moves Main, metronome included, to any stereo pair, for example Out 7-8. Group Routing then lists that pair first as Out 7-8 (Main). On a two-output device the row is hidden, and your choice returns when you switch back.
Multiple outputs in a DAW
As a VST3, AU or AUv3 plugin, eSPi offers 32 stereo output buses: Output (the main pair), then Out 3-4, Out 5-6 and so on up to Out 63-64.
- In your DAW, enable the extra outputs on the eSPi instrument. Only the main bus is on by default.
- In eSPi's Settings › Audio › Group Routing, send each group to a bus.
- Each bus now arrives on its own channel in your DAW's mixer.
In AUv3 hosts such as AUM, the buses carry the same names, and they are always all on. Unused ones cost nothing. Host-by-host details are in eSPi in Your DAW.