MIDI & Controllers
Pads under your fingers, faders under your palms. Plug in a controller, map it in a minute, and eSPi becomes a piece of hardware again.
MIDI at a glance
How eSPi talks MIDI depends on where it runs. The standalone app handles your hardware directly. The plugin lets your DAW do that job.
- Standalone Standalone
- eSPi opens every MIDI input on the system by itself. There are no input checkboxes to tick. Each controller gets its own slot, so two controllers can be routed and mapped differently.
- Plugin VST3 · AU · AUv3
- eSPi opens no MIDI hardware itself. It hears only what the DAW sends it, on a single input called Host, and its MIDI output goes back to the DAW. See eSPi in Your DAW.
Where MIDI lives
| Place | What you do there |
|---|---|
| MIDI menu (E) | The LCD menu MIDI Function?: 1 MIDI Assign, 2 Save Mapping, 3 Load Mapping, 4 Clear Mapping, 5 MIDI Sync, 6 Bluetooth MIDI (only where the OS offers Bluetooth MIDI pairing: MacOS, iOS, Android). |
| Settings › MIDI | Pad note mapping, clock source, the activity monitor, devices, mapping files, per-channel routing and thru, and the MIDI output device. See Settings › MIDI. |
| Pad right-click menu | Assign MIDI... and MIDI Note.... Long-press on touch. |
| MIDI Learn buttons | MIDI Learn in the Mixer header and MIDI LEARN below cue pad 8 on the Turntable. |
| Settings › Macros | DAW automation lanes. Plugin only. See Automation and Macros. |
To open a MIDI menu item, press E (or click the MIDI menu button), then type the item number, or step through the items with ◄ / ► and press Enter. You can also click an item's label on the faceplate. While an item's screen is open (MIDI Sync, the device list of Save, Load or Clear Mapping, or the source list of Load Mapping), the MIDI LED stays lit; press the MIDI button again to go back to the Segment or Song screen.
Connect a controller
Plug it in. Hot-plug works: a controller connected while eSPi is running starts working at once, with no restart.
The connect prompt Standalone
Every time a controller connects while eSPi is running, including one you unplug and plug back in, a dialog names it and offers what fits. Controllers already plugged in when eSPi starts don't get the dialog (a Don't ask again for this device controller still loads its saved mapping by itself).
- It has a mapping
- A mapping you saved for it, or a built-in one. Load applies it, and a load can be undone with Cmd/Ctrl + Z. Map it and Load from file are offered too. Tick Don't ask again for this device and a saved mapping loads by itself when the controller connects.
- No mapping yet
- Map it turns on MIDI Learn: touch an on-screen control, then move a knob or hit a pad. Load from file opens a mapping file for this controller, just like From file... in Load Mapping (see Controller maps and sharing). The file becomes this controller's saved mapping.
- Don't ask again for this device
- Tick it and the dialog never shows for that controller again. If you saved a mapping for it, that mapping loads by itself the first time the controller connects in a session, with Loaded mapping: <name>; later reconnects only show <name> reconnected. The choice is stored per physical unit, so a second unit of the same model still asks.
Not now, Escape, the X or a tap outside the dialog close it without changing anything, except that a ticked Don't ask again for this device is saved whichever way you close it. The dialog waits politely while another dialog or a full-screen editor is open, and if several controllers turn up at once, each one gets its dialog in turn.
Unplugging and limits
- Unplugging shows <name> disconnected. The controller keeps its slot, routes and mappings. Plug it back in and everything is restored, and the connect dialog shows again; a controller set to Don't ask again for this device only shows <name> reconnected.
- eSPi handles 7 hardware controllers at once. An eighth still plays pads with the default routing but gets no slot of its own, and Settings › MIDI says so.
- Two controllers with the same model name both work, but they share one saved mapping and drive the same controls together. Set each unit to a different MIDI channel to tell them apart.
Bluetooth MIDI
Press E then 6, or click 6. Bluetooth MIDI on the faceplate. eSPi opens your system's Bluetooth MIDI pairing dialog. On platforms without pairing the item is hidden, or a message says pairing is not available.
Play pads from MIDI
Out of the box, eSPi listens on all 16 channels of every device. Notes play pads, at full level by default. To make velocity (1 to 127) set how hard a pad is hit, right-click it and choose MIDI Velocity › Enabled. Note-off releases pads in Gate mode.
Which notes play which pads is set by Pad Mapping in Settings › MIDI:
| Pad Mapping | Notes | Behaviour |
|---|---|---|
| Bank-Relative (8 pads + bank) default | 36–43 | The eight notes play the eight pads of the bank on screen. Switch bank and the same notes play the new bank. A note held across a bank switch releases the pad it started on. |
| Absolute (32 pads) | 36–67 | Every pad has its own note: A1 = 36 … A8 = 43, B1 = 44 … D8 = 67, whatever bank is showing. |
Notes outside the range are ignored. eSPi calls note 36 C1. Some DAWs call the same note C2.
A note you have mapped with MIDI Learn plays only what you mapped it to. It no longer also plays the pad its note number would pick. Unmap it and the note plays its pad again. This applies with the default Pads + Controls routing; a channel set to Pads only still plays pads by note number.
A MIDI hit behaves exactly like a click on the pad. It selects the pad, so editors, the effects rack and the Truncate, Envelope and Filter faders follow it. It also works with held gestures: hold Tap/Repeat for note repeat, hold Erase while recording for live erase, or hold numpad 0 / 1 to toggle mute or solo. Hold Enter and press Run/Stop to panic. When you record, played notes land on the bank they play. See Recording.
Set what each pad sends
eSPi sends a note every time a pad plays, by hand or from the sequencer, so it can drive drum modules, synths or another track in your DAW. By default pad A1 sends 36 through D8 on 67, on channel 1. Change any pad individually with the MIDI Note dialog.
- Right-click a pad (long-press on touch) and choose MIDI Note.... The dialog is titled MIDI Note: Pad A1 (or whichever pad).
- Fill in the fields. Leave a field blank to use the default.
- Press Save or Return. Cancel or Esc leaves it unchanged.
| Field | Range | Blank means |
|---|---|---|
| Note (blank = derive) | 0–127 | Use the note from MIDI Out Pad Mapping in Settings › MIDI. |
| Channel (1-16) | 1–16 | Default 1. |
| Velocity (blank = played) | 1–127 | Send the velocity you played. A number sends a fixed velocity. |
A live line shows exactly what will go out, such as Sends note 36 ch 1 (derived), or (override) once you set a note. If another pad sends the same note on the same channel, an amber warning names it. It is only a warning, and it also catches clashes the mapping creates on its own. Each changed field is one undo step.
What goes out
- Hand-played pads, sequencer playback and even empty pads send their note, so an empty pad makes a clean trigger for external gear. Muted pads send nothing.
- One-Shot pads send a short note-on/note-off pair. Retriggering a held pad sends the note-off before the new note-on.
- Changing the sample rate, buffer or audio device sends note-offs and All Notes Off.
- Offline renders and resamples send nothing. Incoming MIDI is never echoed unless you turn on thru.
- Quitting the standalone flushes every note. A plugin can't always do that when the DAW closes a project, so a note held at that moment may hang on external gear.
In the standalone, MIDI goes to the device you pick under Send to in Settings › MIDI. It starts closed: eSPi never opens an output on its own.
MIDI Learn
MIDI Learn turns any knob, fader, button or pad on your controller into a control on screen. Click the target, move the hardware, done. There is no confirm step and no save button to remember.
Enter and leave MIDI Learn
Every route below toggles the same mode.
- MIDI menu: press E then 1 (MIDI Assign). Do it again to leave.
- Pad menu: right-click a pad and choose Assign MIDI.... MIDI Learn turns on with that pad already selected.
- Mixer: the MIDI Learn button in the header, lit amber while active.
- Turntable: the MIDI LEARN button below cue pad 8, amber while active.
While it is on, an amber frame and a faint amber wash cover the window, and a chip at the top centre reads MIDI LEARN with the hint Tap a control to map. Click the chip's X to leave. The chip only shows status; use one of the routes above to turn the mode on.
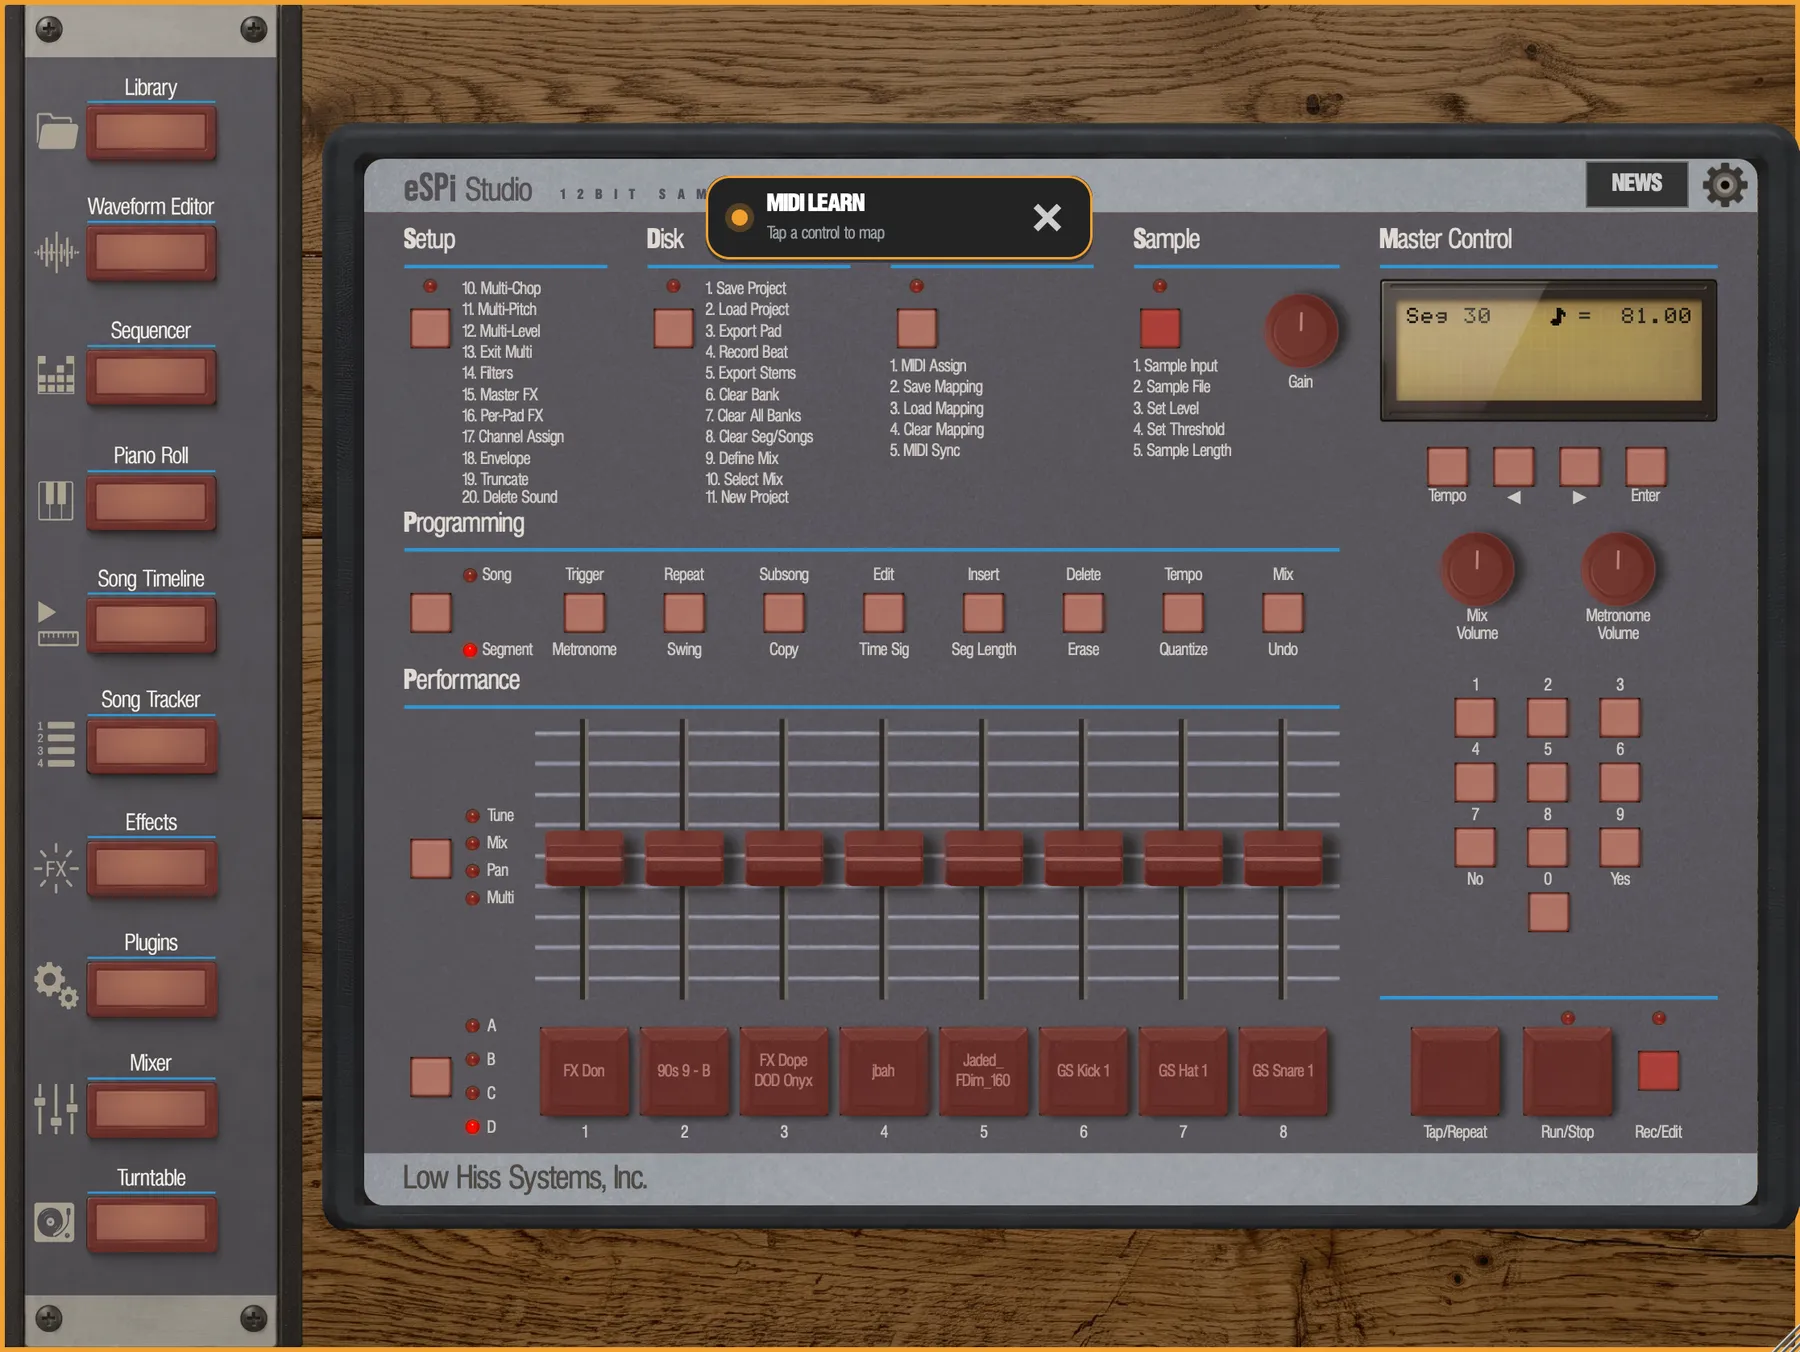 1
2
3
4
5
6
- The chip. Shows that MIDI Learn is on. Its X leaves the mode.
- Amber frame. Runs round the whole window as long as the mode is on.
- MIDI menu. Item 1, MIDI Assign, toggles the mode from the faceplate.
- Performance faders. Mappable in every fader mode. They follow whatever the faders currently control.
- Pads. Mapped by position: pad 1 is pad 1 of whichever bank is showing.
- Sidebar buttons. Mappable too. A mapped sidebar button opens its view from anywhere.
On eSPi Essentials a mapped sidebar button for an eSPi Studio view opens the locked-view panel instead of the view. The mapping stays as it is.
Read the overlay colours
Every mappable control wears a translucent overlay while MIDI Learn is on. Knobs and the turntable platter get round ones.
- Red, no text
- Mappable, not mapped yet.
- Orange
- The control you just clicked, waiting for MIDI. Click another control and the orange moves.
- Green with a label
- Mapped. The label names the message: CC 74, a bare note number such as 36, or Program, Pressure, Pitch Bend. +N means N more messages also drive this control.
Map a control
- Enter MIDI Learn.
- Click the control on screen. It turns orange. In this mode the click doesn't move, press or reset the control.
- Move a knob or fader, or press a button or pad, on your controller. The overlay turns green and a message confirms it, for example Mix Volume <- CC 74 (MyController).
- Repeat for more controls, then leave MIDI Learn.
eSPi learns notes, CCs, Program Change, Channel Pressure and Pitch Bend. Note-offs and clock are never learned. Each click captures one message, and re-mapping a control replaces its old mapping.
Endless encoders are detected. If a knob sends relative ticks (1 and 127, or 63 and 65, as on many controllers with light rings), keep turning it for a couple of clicks: eSPi learns it as a relative encoder and each click then nudges the control one step instead of jumping it to the end. A normal knob or fader is learned on its first move, as before. You can still change the mode in Settings › MIDI.
Pads still sound while you map: hitting a controller pad plays it as normal. A note is only captured when a non-pad control is waiting in orange.
- Clashes move automatically
- If the message you send already drives another control, eSPi moves it to the new one without asking. The confirmation adds , moved from <old control>, and Cmd/Ctrl + Z puts it back.
- Unmap
- Right-click (long-press on touch) a mapped control while in MIDI Learn. Its overlay goes red.
- Undo and redo
- Cmd/Ctrl + Z and Cmd/Ctrl + Shift + Z. Mapping changes share one undo history with your sample edits.
- Getting around
- The sidebar, menus and scrolling keep working. Mappable buttons, including the faceplate menu buttons and sidebar launchers, select for mapping instead of acting, so leave MIDI Learn briefly if you need one of them to take you somewhere.
Mappings save themselves
Every change, whether a learn, an unmap, a mode edit or an undo, is written to the controller's mapping file at once. When that controller connects again, the connect dialog offers to load it, or, if you ticked Don't ask again for this device, it loads by itself with Loaded mapping: <name>.
Mappings belong to the controller, not to the project. Loading a different project leaves them alone. Clear in Settings › MIDI silences a controller for the session without deleting its file.
Each knob or fader mapping has a mode, plus Invert and Pickup switches, in Settings › MIDI › Mapping. Pickup is off for newly learned controls, so a control jumps straight to your hardware's position. Turn it on and a fader that doesn't match the screen does nothing until it crosses the on-screen value. See Settings › MIDI for the modes.
What you can map
| Surface | Mappable controls |
|---|---|
| Machine faceplate | The pads. With Pad Mapping on Bank-Relative they map by position, so the 8 mappings follow bank changes. On Absolute (32 pads) each of the 32 pads takes its own mapping: switch bank and map the next eight. Tap/Repeat, Run/Stop, Rec/Edit. The 8 performance faders, in any fader mode. All 29 buttons: Bank, Setup, Disk, Midi, Sample, Tempo, Left, Right, Enter, Numpad 0–9, Mode, Song/Segment and Programming 1–8; mapped buttons behave like real presses, including hold and auto-repeat. The Mix Volume, Metronome Volume and Sample Gain knobs. |
| Mixer desk | Per strip: Gain, the four EQ bands, Comp, Fader, M, S and the group − / + (pad strips). The master strip's knobs, fader and Run/Stop. Not FX, the meter, the group LCD or the tape label. |
| Effect faceplates | Every parameter knob, on any insert. Not the wet/dry knob, Bypass, Open or the sidechain LCD. |
| Hosted plugin Desktop | The 6 macro knobs. Not wet/dry, and not while the plugin is loading or missing. |
| Waveform Editor | Play/Stop, Loop, Zero-Cross Snap, Reverse, Normalize, Trim, Trim Silence, Auto-Chop, Grid Chop, Add/Delete Region, Zoom In/Out, Fit, Undo, Redo, Move, Cut, Copy, Paste, Set Loop, and the SP Input Gain knob. Greyed-out buttons ignore MIDI too. |
| Sequencer and Piano Roll | Play/Stop, Record, the Drum/Piano chip, the segment and length steppers, Zoom In/Out, Clear, Duplicate, Copy, Paste, Undo, Redo and the BPM chip. |
| Song Timeline | Play/Stop, Undo, Redo, Insert, Delete, Close, and each < / > of the Segment, Repeat, Tempo (standalone only), Swing, Transpose and Mix steppers. |
| Song Tracker | Play/Stop, the Song stepper, Undo, Redo, Insert, Delete, the D-pad, Enter and Close. |
| Turntable | Start/Stop, 33 / 45 / 78, Quartz/Reset, x2 Range, the 8 cue pads, Crossfader, CF Curve, both upfaders, the 6 EQ knobs, Pitch, and the platter. |
| Sidebar | Sequencer, Piano Roll, Waveform Editor, Song Timeline, Song Tracker, Turntable, Effects, Plugins, Library (standalone) and Mixer. |
Mapped faceplate buttons and knobs work only while the eSPi window is open. Pads, faders and transport always work. Mappings on editor screens are kept when you close the screen and come back to life when you reopen it. When a DAW or external clock controls tempo, a BPM mapping does nothing.
Map a DJ jog wheel to the platter
- On the Turntable, enter MIDI Learn and click the platter.
- Turn the jog. eSPi learns it as a relative encoder and detects both common jog formats.
- On a touch-sensitive jog, rest your hand on it and then turn. One selection maps both the touch note and the rotation, with a confirmation for each.
Turning scratches the record and normal spin resumes a moment after you stop. Touching the jog holds the record; lifting your hand lets it play. A finger on the on-screen platter takes over from the jog. Pitch covers ±16%, or ±32% with x2 on. See The Turntable.
Sync with MIDI clock
MIDI clock keeps eSPi and your other gear in step. eSPi can send clock, follow it, or both stay off.
- Press E then 5. The MIDI Sync screen stays up until you leave it.
- Press Enter to move between the two rows, and ◄ / ► to change the value of the row marked >.
- Press Tempo or the MIDI button to exit.
The MIDI Sync screen. In a plugin, Source reads Host and can't be changed.
Send clock
Set Send Clk to On (it is off by default). eSPi sends 24 PPQN clock with Start, Stop, Continue and Song Position Pointer. In the standalone it goes to the output picked in Settings › MIDI; in a plugin it goes to the DAW.
- Turn it on mid-playback and your gear jumps to the current position and locks.
- Starting from anywhere but the top sends Song Position plus Continue. Turning it off mid-play sends Stop.
- Tempo changes are followed. Turntable varispeed does not change the clock.
- In a plugin the clock follows the DAW's tempo, play state and position.
- Song Position wraps after about 4096 quarter notes, roughly 34 minutes at 120 BPM. That is a limit of MIDI itself.
Follow external clock Standalone
Set Source to External, or set Clock Sync Source in Settings › MIDI. eSPi's transport now follows the master's Start, Stop, Continue, tempo and Song Position. The recovered tempo shows on the BPM display within about a quarter of a second of locking.
- While following, the BPM is read-only. Pressing Tempo doesn't open tempo entry: the LCD shows External Sync is enabled for a couple of seconds, then goes back to the main screen. Tap tempo does nothing. Before the first lock the BPM reads the default 90.
- Switch back to Internal and your project's own tempo returns untouched.
- The Sequencer's own PLAY still auditions on the internal clock.
- If the clock cable is pulled without a Stop, eSPi keeps playing at the last tempo until it receives one.
Both clock settings belong to your machine, not the project, and neither changes the audio.
Controller maps and sharing
eSPi doesn't ship ready-made maps for specific controllers. Every controller starts with MIDI Learn, which takes a couple of minutes.
Each controller's mapping lives in its own file named after the controller, ending in .espimap.json. On MacOS they are in ~/Library/Application Support/daw-eSPi/MidiMaps/. Copy a file to another computer to take your mapping with you, or export and import it from the MIDI menu.
- From the faceplate, MIDI menu items 2, 3 and 4 save, load and clear the mapping. Settings › MIDI has the same save, load and clear actions plus Reset to Built-in; the export, the import and the clear confirmation are on the MIDI menu only.
- Save Mapping saves the mapping, then asks Export to file?. Press 9 to write a copy wherever you choose, named after the controller and ending in
.espimap.json, or 7 to keep only the saved mapping. On iOS and Android the system's save dialog opens. - Load Mapping asks for the controller, then for the source: Saved mapping loads the mapping you saved, and From file... opens a mapping file, for example one shared by someone with the same controller. The file's mapping goes to the controller you picked, whatever its
"device"field says, and becomes that controller's saved mapping. Undo brings back the previous mapping. A file that isn't a mapping shows Bad mapping file and changes nothing. - Clear Mapping always asks for the controller, even when only one is connected, then Clear mapping?: 9 clears the live mapping, 7 or 0 leaves it alone. The saved file is kept, and undo brings the mapping back.
- A file you copy into the MidiMaps folder yourself must carry the name the controller reports in its
"device"field, or Saved mapping refuses it and explains why. Edit that field to adapt a map to another unit, or use From file..., which doesn't need it.