Sequencing
Press record, play the pads, let the loop come round again. eSPi's sequencer works the way the SP-1200's did, so the beat builds up pass by pass while you keep your hands on the pads.
Segments, songs and one timeline
Everything you record lives in a segment: one looping pattern, the SP-1200's word for it. There are 100 segment slots, numbered 00 to 99, and the number on the LCD is the slot. A new segment is 2 bars of 4/4, straight (50% swing), with Auto-Correct set to 1/16.
A song is an ordered list of steps. Each step plays one segment, can repeat it, and can change the tempo, swing, transpose or Mix while it plays. There are 100 songs (00 to 99), each up to 99 steps long. Building songs is covered in Songs.
A new project, and a full clear, starts on segment 01 and song 01. Slot 00 exists and works like any other; you just don't start there. The project tempo starts at 90 BPM, and the range is 30 to 400 BPM.
The home screen
The LCD's home screen tells you what will play and how fast. The Song/Segment button (Caps Lock), at the left of the Programming section, switches between Segment mode and Song mode. Its Song and Segment LEDs show which one you are in. Pressing it also closes any open menu or sub-screen and takes you home.
Segment mode and Song mode. The number is the segment or song that plays when you press Run/Stop.
Choose a segment or song
Press ◄ or ► (or the arrow keys), or type two digits on the numpad: 0 5 selects Seg 05. The first digit waits on the LCD for the second. In Segment mode, a new segment takes over on the next loop, so you can switch patterns while the transport runs. In Song mode, the number picks the song that plays.
The progress bar
While the transport runs, the bottom line of the home screen fills as the loop plays. In Segment mode it has one division per bar. In Song mode it has one per song step, sized by how long each step lasts. Thin gaps mark the divisions when there are 2 to 32 of them; otherwise it is one continuous bar. During a record count-in, the first cell counts down the beats (or the bars, while more than nine beats remain). The bar hides when you stop, and whenever a menu or message is on screen.
Transport
Three buttons at the bottom right of the faceplate run the show. The LEDs on Run/Stop and Rec/Edit always show what the engine is really doing.
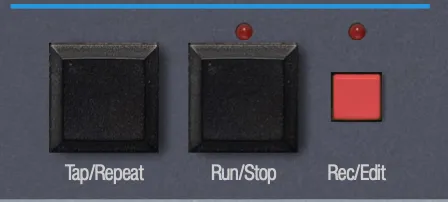
- Run/Stop · Space
- Starts playback from the beginning of the segment or song. Press it while playing to stop and rewind. There is no pause. While recording, it stops recording and playback together.
- Panic · right-click, Ctrl-click or long-press Run/Stop
- Stops everything, rewinds, and cuts every voice that is still sounding, including long one-shots. Holding Enter and pressing Run/Stop does the same, from the faceplate, the keyboard or MIDI.
- Rec/Edit · Right Alt
- In Segment mode, arms recording (see Record a beat). In Song mode it opens and closes Song Edit instead, and never records.
- Tap/Repeat · Right Shift
- On the tempo screen, taps the tempo. Held with a pad, it plays note repeat.
Tempo
Press Tempo, next to ◄ ► and Enter, or press =. A cursor blinks on the BPM digits. Then set it any of three ways:
- Type it. A first digit of 1 to 4 expects five digits (
NNN.NN); 5 to 9 expects four (NN.NN). The value applies on the last digit. Press Enter to apply early, with the rest filled by zeros: 8 2 Enter gives 82.00. - Nudge it. ◄ and ► move it by 1 BPM. Hold to repeat.
- Tap it. Tap Tap/Repeat (or Right Shift) in time. The tempo follows live and you stay on the screen to keep tapping. Pause for about two seconds and the next tap starts a fresh measurement.
Tempo entry. Press Tempo again, or Enter with nothing typed, to leave without changing anything.
The tempo is saved with the project. Tempo also works as the universal way out: from any menu or screen, it jumps straight to tempo entry. When an external MIDI clock is driving eSPi, the tempo is read-only and shows the incoming value.
The Programming buttons
Eight buttons shape the active segment. Each has two labels: the bottom label is what it does in Segment mode, and the top label is its job in Song Edit (see Songs).

| Button | Key | In Segment mode |
|---|---|---|
| Metronome | A | Count-In screen |
| Swing | S | Swing screen |
| Copy | D | Copy or append a segment |
| Time Sig | F | Time-signature screen |
| Seg Length | G | Segment length screen |
| Erase | H | Erase menu (tap), or Live Erase (long-press while recording) |
| Quantize | J | Auto-Correct screen |
| Undo | K | Undo, or redo when there is nothing left to undo |
The value screens (Count-In, Swing, Time Sig, Seg Length and Quantize) all work the same way. Press the button to open the screen, use ◄ and ► to change the value, and press the same button again to go home. Values stop at each end rather than wrapping. Each change applies to the active segment, is heard on the next loop, and is one undo step. Count-In is the exception: it is a global setting and isn't undoable.
Metronome: count-in
Off, 1/2 bar, 1 bar (default), then 2, 3 or 4 bars. Global and saved.
Swing
Swing pushes the off-beats late for that lazy, behind-the-beat feel. ◄ and ► step through the SP-1200 presets 50, 54, 58, 63, 67 and 71 percent, where 50 is straight. Type two digits to set any value from 50 to 99; after the first digit the LCD shows Swing: 6 % while it waits for the second. From a typed value, ◄ and ► jump to the nearest preset on that side.
Swing is applied as the segment plays. It never moves your stored notes, so change it whenever you like.
At the default Swing Resolution of 1/8, swing delays the off-beat eighths. At 1/16 it delays the second and fourth sixteenth of each beat. Change it in Settings › Engine.
Copy: copy or append a segment
- Press Copy. The LCD asks for the segment to copy.
- Type the two-digit source. If it is empty, Segment 07 is empty flashes and the screen asks again.
- Type the two-digit target.
- Confirm with Enter or 9 (yes), or press 7 (no). Press Copy at any point to cancel.
If the target is empty, you get a full copy: notes, length, meter, swing and Auto-Correct. If it already holds notes, or is the same segment, eSPi appends instead: the source is added after the target's content and the target gets longer. Nothing is overwritten, and appending a segment to itself doubles it. An append that would run past 99 bars is refused with Segment too long (max 99 bars). Copy and append are undoable.
Time Sig
4/4, 3/4, 2/4, 5/4, 6/8, 7/8 and 12/8. Changing it changes the loop length and moves the metronome accent.
Seg Length
1 to 99 bars.
Shortening a segment is safe. Notes past the new end stop playing but are kept, and they come back when you lengthen it again, even after a save and reload.
Erase
Tap Erase to clear a whole segment or one pad's part.
- A whole segment: type its two-digit number. The LCD asks Erase Segment 05 and Confirm? (yes/no).
- One pad's notes in the current segment: press the pad (it plays as you press it).
Yes is Enter or 9, no is 7. Tap Erase again to cancel; changing bank, menu or mode cancels too. Erasing is undoable. Long-press Erase while recording for Live Erase.
Quantize: Auto-Correct
off, 1/2, 1/4, 1/8, 1/8t, 1/16 (default), 1/16t, 1/32, 1/32t and HiRes. A t means triplet.
As on the SP-1200, Auto-Correct works while you record: new hits snap to this grid as they go in. Changing it never moves notes you have already recorded, so set it before you play the part you want tightened. off keeps your exact timing. HiRes snaps only to the fine Sequencer Resolution clock (24, 48 or 96 PPQ, in Settings). Auto-Correct also sets the note-repeat rate, and the Sequencer Grid's division to match.
Undo
Undoes the most recent edit on the shared timeline. When there is nothing left to undo, it redoes. Cmd/Ctrl + Z undoes and Cmd/Ctrl + Shift + Z (or Ctrl + Y) redoes, inside the editors too. In the standalone app, the menu bar also has an undo History submenu.
Record a beat
- Be in Segment mode and pick a segment.
- Optionally set Auto-Correct (J), Count-In (A), Seg Length (G), Time Sig (F) and the tempo.
- With the transport stopped, press Rec/Edit (Right Alt). The metronome counts you in while the progress bar counts down. Recording starts on the downbeat, and the Rec and Run/Stop LEDs light.
- Play the pads: click them, use Z X C V B N M , for pads 1 to 8, or play MIDI notes. A hit you play just ahead of the downbeat lands on beat 1.
- Press Rec/Edit again to stop recording. Playback keeps looping so you hear the take straight away.
- Press Run/Stop to stop. Pressing it while still recording stops both.
New hits are heard from the next pass of the loop, not the pass you played them on. Don't like the take? Press Undo once and the whole pass is gone: each recording pass is one undo step.
Overdub
Press Rec/Edit while the segment is already playing to drop straight into recording at the playhead, with no count-in and no restart. Every pass adds notes. A new hit on the same pad at the same position (after Auto-Correct) replaces the old one rather than doubling it. The take stays on one segment for the whole pass, even if you switch segments partway through.
What gets recorded
- Timing (snapped by Auto-Correct), velocity and, for pads in Gate mode, how long you held the pad.
- On Multi-Mode banks, each hit is recorded as the source pad with the instance's pitch, level or chop, so the part keeps sounding the same after you leave Multi-Mode.
- Fader moves are not recorded into the sequence.
- With record armed but the transport stopped, pad presses are not recorded.
Inside a DAW, Rec/Edit arms and waits. Recording starts when the host plays, and the host's pre-roll serves as the count-in. eSPi never starts the host transport itself.
Lock Pitch on Record
Normally, retuning a pad retunes every note it has in the sequence. Turn on Lock Pitch on Record in Settings › Engine and each recorded note keeps the pad's semitone tune from the moment you played it. Retune the pad later and those notes stay put, while live presses use the new tune. It is off by default and is a machine preference, not part of the project.
- Only the semitone tune is locked. Fine cents, turntable speed and pitch mode stay live.
- Notes drawn in the grid are never locked. Copied and pasted notes keep their lock; moving a note to another pad unlocks it.
- A locked note stays locked even if you turn the option off later. In the Piano Roll it sits in the lane it was recorded at.
Live Erase
Fix a part without stopping the take, just as SP-1200 players always have.
- While recording, hold Erase (H) for about 0.8 seconds.
- Hold a pad. Its notes are removed as the playhead sweeps over them, and they go silent immediately, on the current pass.
- Tap Erase to leave Live Erase.
While this screen is up, pads erase and do not play.
Live erases belong to the take, so one Undo brings them back along with everything else in the pass. Long-pressing Erase when you aren't recording just opens the erase menu.
Mute and solo
Drop a part out to hear the rest, or isolate it to fix it. Mute and solo affect every source (the sequence, live pads and MIDI) and are saved with the project. A muted pad is dimmed on the faceplate.
- Hold 0 (on the numpad or the keyboard) and press pads to mute or unmute them. Hold 1 and press pads to solo them. The pads don't sound while you do this, and each toggle is one undo step. On a touch screen, hold 0 or 1 with one finger and tap pads with another. This works on the home screen only; inside a menu the digit goes to the menu.
- Pad menu: right-click (or long-press) a pad for Mute and Solo. They read Un-mute and Un-solo when active. See the pad menu.
- Esc on the home screen mutes or unmutes the selected pad.
Mute beats solo: a pad that is both muted and soloed stays silent. If you hold 0 and 1 together, mute wins. The Sequencer Grid also has M and S buttons on every row; see Grid & Piano Roll.
Note repeat
Rolls, hat runs and stutters, without the finger workout. Hold Tap/Repeat (or Right Shift) and hold a pad: it retriggers at the segment's Auto-Correct rate.
- While playing, the first hit lands on the next grid line, locked to the beat. While stopped, it fires at once and repeats at the project tempo.
- Several pads can repeat together. Let go of a pad to stop it, or let go of the button to stop them all.
- Repeats are recorded when you are recording and the transport is running.
- When Auto-Correct is off or HiRes there is no grid to repeat on, so the pad plays once.
- Live Erase takes priority over repeat. On the tempo screen, the button still taps tempo.
Metronome and count-in
Set the click's level with the Metronome Volume knob in the Master Control area, next to Mix Volume. Everything else is in Settings › Metronome:
- Mode
- Off, Record Only (default: clicks during the count-in and while recording) or Record + Playback (clicks whenever the transport runs).
- Rate
- Half, Quarter (default), Eighth or Sixteenth.
- Gain
- Click level. Default 0.5.
- Count-In Bars
- The same setting as the LCD Count-In screen.
- Sound
- Classic, Sine, Square, Noise or Custom..., with a Load custom... button for your own click.
The first beat of each bar gets a higher-pitched accent. The click is never recorded and never ends up in exports. Plain playback never counts in; only recording does.
The Performance faders
The Mode button (Left Shift) cycles the eight faders through Tune, Mix and Pan, then back home. The Tune, Mix, Pan and Multi LEDs show the mode; Multi lights when a Multi-Mode overlay is on. Each fader controls one pad of the current bank, and double-clicking resets it.
Fader moves are heard on sequenced notes immediately. Tune a pad down and its whole part drops with it, except notes recorded with Lock Pitch. Every move is undoable, and fader moves are not recorded into the sequence. The full story is in Pads & Banks.
MIDI clock and host sync
In a DAW, the sequencer follows the host's play, stop, tempo and position, including host loops. Rec/Edit arms and waits for the host to play, song-step tempos are read-only, and Swing is exposed as an automatable parameter. See eSPi in Your DAW.
In the standalone app, MIDI › MIDI Sync (item 5) sets the clock source and whether eSPi sends clock.
◄ ► change the selected row, Enter moves between rows, Tempo exits.
External follows an incoming MIDI clock, including start, stop, continue, tempo and song position, and makes the tempo display read-only. Send Clk: On transmits clock with the transport. Both are machine preferences, not saved in the project. Details are in MIDI clock.
In SP-1200 Mode
With SP-1200 Mode set to Original or Reissue, the sequencer takes on the hardware's limits:
- Tempo is limited to 40 to 240 BPM, for tempo entry and song-step tempos alike.
- Swing is limited to the six presets. Typing a swing value on the LCD does nothing, the grid's Manual… option is hidden, and song-step swing snaps to the nearest preset.
- Swing Resolution is fixed at 1/8.
- Lock Pitch on Record is always on, shown checked and greyed in Settings.
- When the sequence memory fills up, recording stops adding notes and the LCD shows MEMORY FULL! once.