Waveform Editor
The faders are fast, but sometimes you need to see the sound. The editor is where you trim by eye, chop a break into eight hits and spread them across a bank in one move.
Open the editor
Right-click a pad (or long-press it on touch) and choose Edit Waveform.... You can also press the Waveform Editor button in the sidebar on desktop, or in the footer on mobile. The editor fills the window over the machine, under the title Edit Waveform.
Close it with the × at the top right or with Esc.
Choosing the pad
The pad selector in the middle of the title row shows the pad being edited, such as D4 - jbah. Click it to switch to another pad. It lists only pads that hold samples, grouped as Bank A to Bank D: as submenus on desktop, as one flat list on touch. With an empty pad selected, the editor shows NO SAMPLE.
The editor also follows the pad you select on the machine. Each pad keeps its own zoom, selection, chops and undo history, so you can hop between pads without losing your place.
The display
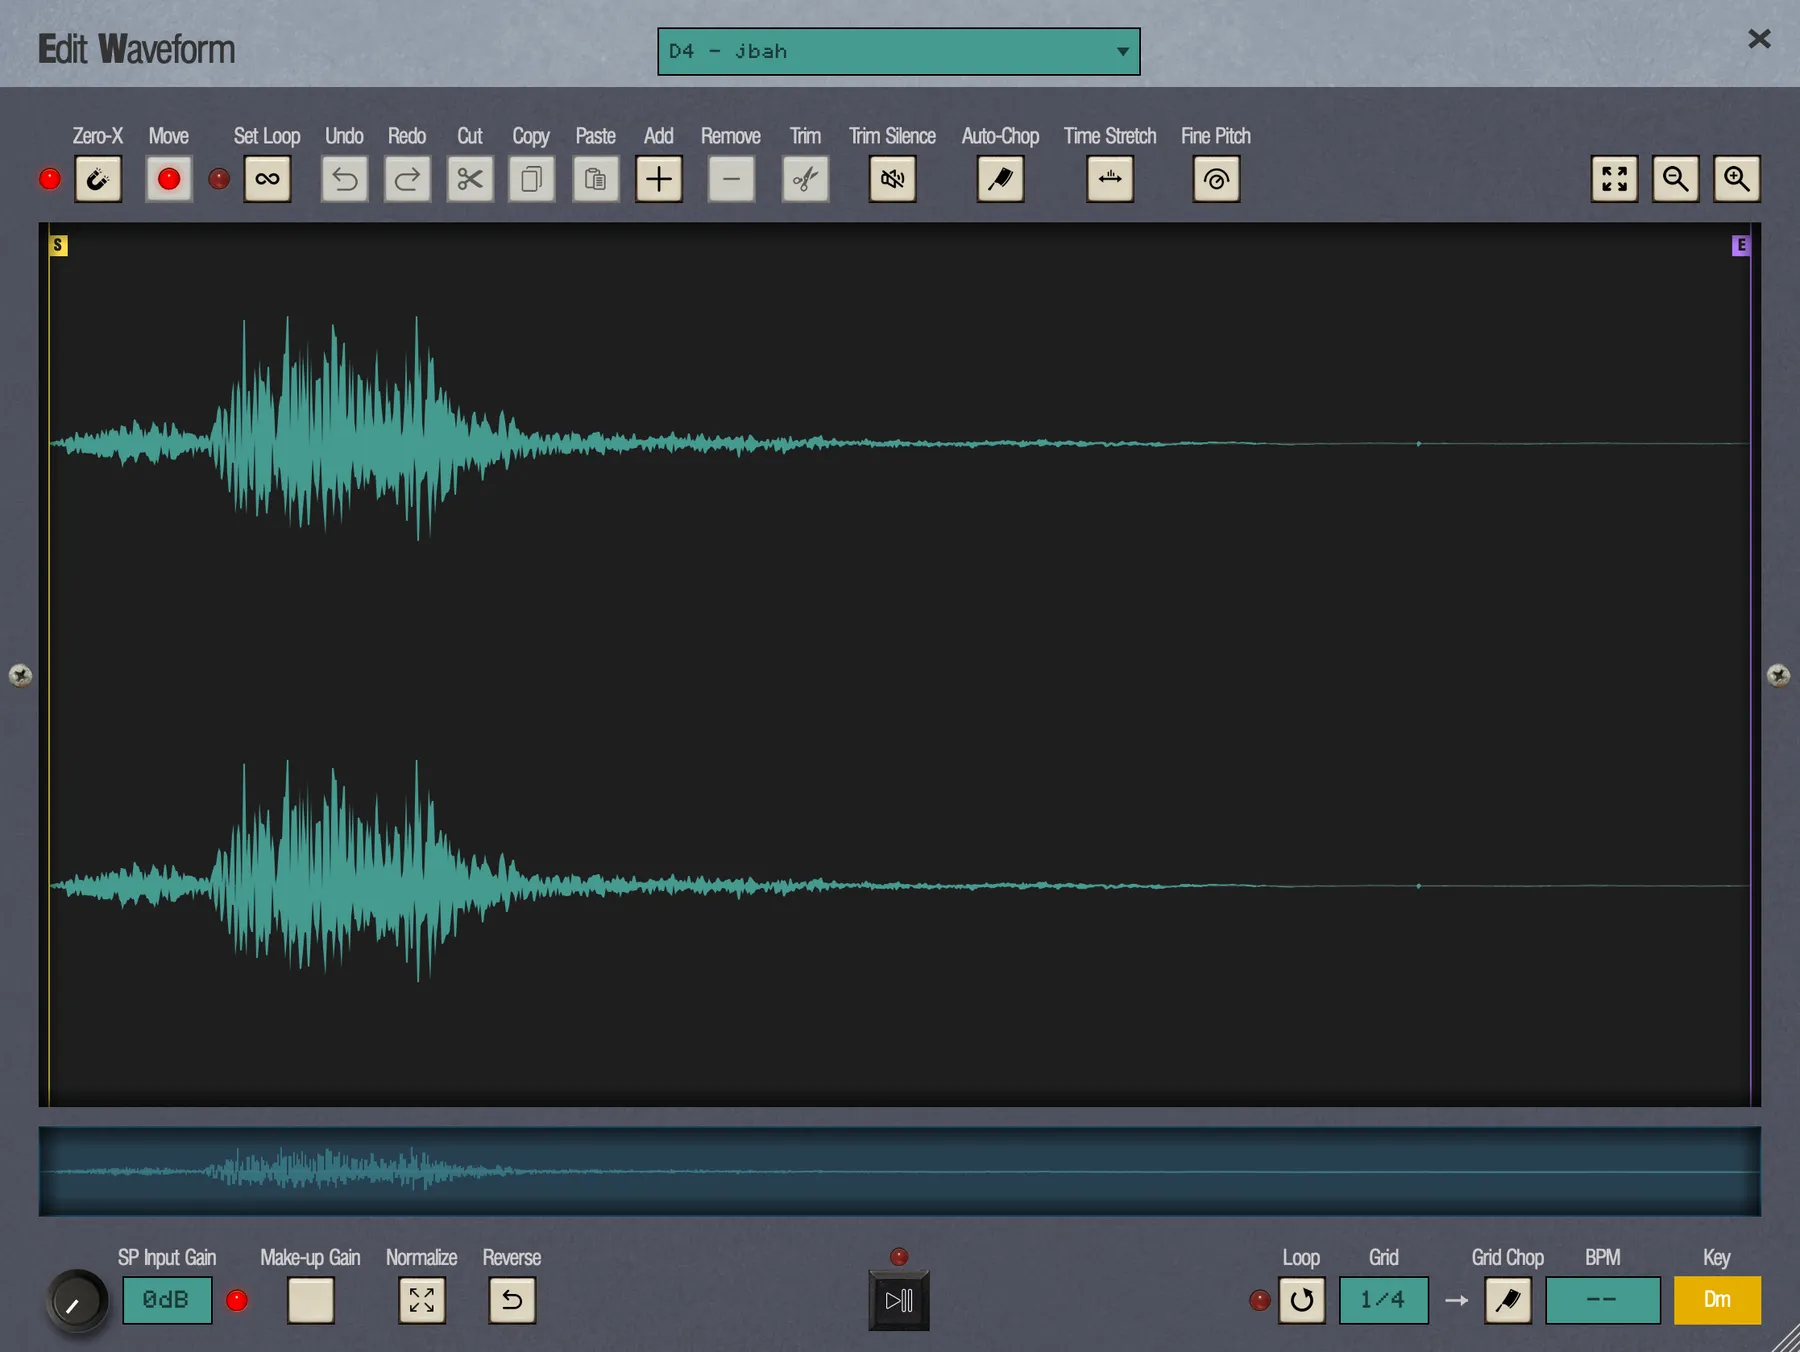 1
2
3
4
5
6
7
8
9
10
11
12
13
14
15
16
17
18
19
- Pad selector. The pad being edited. Click to pick another.
- Zero-X. Snap start and end to zero crossings. The LED shows it is on.
- Undo, Redo. This pad's edit history.
- Move. Drag the selection along the sample.
- Cut, Copy, Paste. The audio clipboard, shared across pads.
- Add, Remove. Make a new chop, or delete the selected one.
- Trim, Trim Silence. Keep only the selection, or shave off quiet ends.
- Auto-Chop. Chop at the hits.
- Time Stretch. Change the length without changing the pitch.
- Fine Pitch. Detune by cents.
- Fit, zoom out, zoom in.
- Overview. The whole sample, with a box around the part on screen.
- SP Input Gain. Drive the SP-1200 input stage harder.
- Make-up Gain. Level compensation for that drive.
- Normalize, Reverse.
- Play/Stop. The LED above it lights while playing.
- Loop. Repeat the selection while playing.
- Grid, Grid Chop. Chop by musical division.
- BPM, Key. Detected tempo and key. Click either to set it yourself.
The waveform shows one lane for a mono sample and two lanes, left and right, for stereo, following the pad's Audio Mode. The parts trimmed off the start and end are dimmed. A playhead runs across during playback, and a selection shows its length inside it in orange, for example Duration: 2.6s.
Zoom and scroll
- Zoom with the mouse wheel (it zooms at the cursor), a trackpad pinch, or a two-finger pinch on touch. Or use the + and − buttons; Fit shows the whole sample.
- Scroll with a horizontal scroll gesture or the ←/→ keys, which move one eighth of the view per press. Drag the box in the overview strip to jump. On touch, drag with two fingers.
Zooming and scrolling aren't recorded in Undo.
Select and trim
The start and end you set here are the same points the Truncate faders control. Change one and the other follows, so use whichever suits the moment.
- Drag a handle
- Grab the start or end handle (within about 12 pixels) and move it.
- Drag across the waveform
- Makes a new selection, setting start and end in one move.
- Click without dragging
- Clears the selection back to the whole sample, and drops an insert cursor for Paste.
- Zero-X
- On by default. Start and end land on zero crossings when you let go, so trims don't click. The same switch controls snapping in Truncate.
Each drag is one Undo step, named Trim Start, Trim End, Set Region or Move Selection. Moving the handles while a note is playing doesn't restart it; the new points apply from the next hit.
Set the loop point
The start handle is yellow and marked S, the end handle purple and marked E. When the pad has a loop point, set here or with the Truncate loop faders, it shows as an orange line marked L.
- Set Loop Cmd/Ctrl + L
- An LED toggle, off by default and off again each time the editor opens. While it is on, click or tap the waveform to put the loop point there, and drag to move it. The loop point stays inside the selection, and the selection, handles and chops are left alone. With Zero-X on, the loop point lands on a zero crossing when you let go.
Each placement is one Undo step, named Set Loop. To turn the loop off, press the X in the middle of the orange line (one Undo step, Clear Loop). The Truncate loop faders follow, so the loop is where you left it the next time you open Truncate.
Move, cut, copy and paste
The clipboard lets you rearrange a sound, or lift a piece of one pad onto another.
- Move Cmd/Ctrl + M
- An LED toggle, on by default. Drag inside the selection to slide it along the sample without changing its length. Snap isn't applied while moving. When the selection is a chop, the drag moves the chop itself, and Zero-X applies when you let go. Greyed out when there is no selection.
- Cut Cmd/Ctrl + X
- Removes the selection and keeps it on the clipboard. The insert cursor lands at the join. Status: Cut N samples.
- Copy Cmd/Ctrl + C
- Status: Copied N samples.
- Paste Cmd/Ctrl + V
- Replaces the selection, or inserts at the insert cursor. The pasted audio becomes the new selection and your zoom stays put.
The clipboard works across pads: audio is converted to the destination pad's sample rate and channel count. Paste onto an empty pad and you get a new sample named Pasted. If it can't be done, the status reads Paste failed or Paste failed: sample too long.
Playback
The Play/Stop pad sits at the bottom centre, with an LED that lights while it plays. Space does the same while the editor is open; it doesn't start the sequencer. Play covers the current selection, or the selected chop.
Turn on Loop (off by default) and Play repeats the selection until you press Stop, which is the quickest way to find a clean loop point. Move the start, end or loop point while it repeats and you hear the change on the pass that is playing, without waiting for the next repeat; if the playhead ends up outside the new selection, playback starts again from the new start. Pad keys and MIDI still trigger pads while the editor is open.
Chops
Chops mark the hits inside a sample: the kick, the snare, the ghost note. Once they are marked you can audition them from the keyboard and send them to their own pads.
A pad can hold up to eight chops, each with its own colour, named Chop 1 to Chop 8. Chops may overlap.
- Create
- Hold Alt/⌥ and drag across the waveform. On touch, hold a finger still for about half a second, then drag. Or press Add, which makes a chop one eighth of the sample long, starting at the trim start or after the rightmost chop.
- Select
- Click it. On touch, tapping a chop also plays it. The selected chop becomes the play window, and its edges become the trim points.
- Move
- Drag its body. On touch, long-press first, then drag. With Move on, no long-press is needed: drag the selected chop straight away.
- Resize
- Drag either edge.
- Rename
- Type in the Chop Name box at the bottom left. It appears while a chop is selected.
- Delete
- Press Remove, or Delete/Backspace. The remaining default names renumber to stay in order.
- Play
- Press 1–8 on the number row to select and play that chop. Desktop
Every chop edit can be undone.
Auto-Chop
Let eSPi find the hits for you. Auto-Chop is built for drums and other percussive material.
- Press Auto-Chop. The status shows Analyzing....
- eSPi searches the whole sample, not just the trimmed part, and lays down up to eight chops back to back, one per hit. If it finds fewer hits, you get fewer chops.
If nothing is found, the status reads No transients found. Running Auto-Chop again replaces all existing chops, and the whole run is a single Undo step.
Grid Chop
For loops and melodic material, chop by the beat instead of by the hit.
- Set the division in the Grid display: 4 bars, 3 bars, 2 bars, 1 bar, 1/2, 1/4 (the default), 1/8, 1/16 or 1/32, assuming 4/4. On desktop, click it to pick from a list; on touch, tap to step through.
- If the pad's BPM is known, faint gridlines preview the cuts. They start from the trim start, or from the first hit in the sample.
- Press Grid Chop. eSPi makes back-to-back chops one division long, up to eight. If the BPM isn't known yet, it detects it first.
If detection fails, the status reads No BPM detected. A chop that can't be made reads Grid-Chop failed.
BPM and key
When you open a sample, eSPi works out its tempo and key in the background. While it works, the readouts show BPM ... and KEY ...; if nothing is found, BPM -- and KEY --.
The values follow the pad's Tune setting. Pitch the pad up an octave and the BPM shown doubles, so the readout always tells you what you are actually hearing.
- Set the BPM
- Click the BPM readout and type a value from 30 to 400. Your value takes priority and is marked
*. Clear the box and confirm to go back to the detected value. - Set the key
- Click the Key readout and choose from all 24 keys, C/Cm up to B/Bm. Each key is shown in its colour on the Camelot wheel, so compatible keys are easy to spot. Choose Reset to detected to go back.
The same values appear as chips at the top of the pad context menu.
Export chops to a bank
This is the payoff: one break, eight pads, ready to play and resequence.
- Make at least two chops. The Export to Bank button appears.
- Press it and choose Bank A to Bank D. The current bank is marked (current).
- The Export Chops to Bank confirmation spells out what will happen, for example Export 6 chops to Bank B? Overwrites pads B1-B6.
- Tick Chops on same channel if you want the exported pads to cut each other off. It puts them all on the source pad's choke channel. It is off by default.
- Press YES (or Enter). NO or Esc cancels.
Chop 1 goes to pad 1 of the target bank, chop 2 to pad 2, and so on. Pads beyond the last chop keep their sounds. eSPi switches to the target bank and the status reads Exported 6 chops to Bank B.
Each pad takes its chop's name if you renamed it, or the source name plus a number, such as amen-3. Export can be undone with Cmd/Ctrl + Z, which restores every pad it overwrote.
Whole-sample edits
These buttons rework the sample itself, so they remove any chops on the pad. Every one of them can be undone.
- Trim
- Keeps only the selection. Needs a selection.
- Trim Silence
- Removes the quiet start and end of the sample, anything below about −48 dB.
- Normalize, Reverse
- The same as the pad-menu items described in Loading & Sampling. Normalize may report Already maximized or Silent - nothing to normalize.
- SP Input Gain
- A knob with a dB readout, 0 to 40 dB. It drives the SP-1200 input stage harder and is applied to the sample when you let go. Turning it again replaces the previous setting rather than stacking on it. It appears only when Input Stage (SP-1200) is on in Settings › Engine.
- Make-up Gain
- An LED toggle, on by default, shared by all pads. It controls whether the level is compensated for the extra input drive.
Delete Pad
The trashcan button right of Normalize and Reverse empties the pad: its sample, all its settings and its effects, the same as Delete Sound in the pad menu. eSPi asks Delete pad A1? Clears its sample, settings and effects. first; YES deletes, NO backs out. One Undo brings everything back. The button is greyed out on an empty pad and in a Multi-Mode instance view, and it may be hidden when the editor window is too narrow.
Time Stretch
Change a loop's length without changing its pitch, for instance to fit it to the project tempo.
- Algorithm
- Clean or S950. S950 adds Cycle (5–50 ms, default 25) and a Poly/Mono choice.
- Stretch %
- 10 to 800; 100 is the original length.
- Sync to BPM
- Fills in the percentage that matches the project tempo, with a readout such as Pad 92 BPM / Proj 90 BPM. /2 and x2 halve or double the result. Without a pad tempo you see No pad BPM detected. Results out of range are clamped and marked (clamped).
Press Apply or Cancel. The percentage is always measured against the original sample, so adjusting a stretch never stacks on the last one. Applying the same setting again reports No change; a failure reports Timestretch failed.
Fine Pitch
Detune a sample by cents to sit it in tune with a bassline or another sample.
- Use the Detune slider (±100 cents), type a value in the Cents box, or nudge with −1 c and +1 c. Reset returns to zero, and Play/Stop auditions.
- You hear changes live as you adjust, and pad keys keep working while the dialog is open.
- Apply makes one Undo step. Cancel, Esc, the close button or tapping outside restores the value the pad had when you opened the dialog.
- Fine Pitch works in both the SP 1200 and Clean pitch modes.
Undo in the editor
Use the Undo and Redo buttons, or Cmd/Ctrl + Z to undo and Cmd/Ctrl + Shift + Z or Ctrl + Y to redo. Each pad has its own history. Making a new edit after an undo discards the steps you could have redone.
Keyboard summary
| Key | Does |
|---|---|
| Esc | Close the editor |
| Space | Play / Stop |
| ← → | Scroll |
| 1–8 | Select and play chop 1–8 |
| Delete / Backspace | Delete the selected chop |
| Cmd/Ctrl + Z | Undo |
| Cmd/Ctrl + Shift + Z, Ctrl + Y | Redo |
| Cmd/Ctrl + X / C / V | Cut / Copy / Paste |
| Cmd/Ctrl + M | Move on or off |
| Cmd/Ctrl + L | Set Loop on or off |
| Alt/⌥ + drag | Create a chop |
| Mouse wheel | Zoom at the cursor |
| Z X C V B N M , | Play pads 1–8 (still active in the editor) |
Every other shortcut is in Shortcuts & Gestures.