Loading & Sampling
A drum machine is only as good as what you feed it. Drop in files, pull the audio out of a video, or sample a record straight through your interface, then trim it with the faders the way it was done in 1987.
What eSPi can load
eSPi takes the common audio formats, and it can also pull the soundtrack out of a video. Every format works on every platform: MacOS, Windows, Linux, iOS and Android.
| Kind | Extensions |
|---|---|
| Audio | .wav, .aiff, .aif, .flac, .ogg, .mp3 |
| Video and media | .mp4, .mov, .m4a, .m4v, .mkv, .avi, .webm, .ogv, .wmv. eSPi extracts the main audio track. |
- Length
- Up to 10 minutes. A longer audio file is refused with Sample exceeds 600s limit. From a video, only the first 10 minutes of audio are extracted.
- Size
- Files opened through a mobile or cloud picker can be up to 256 MB. Anything bigger reports File too large (>256 MB).
- Channels
- Multichannel audio from a video is mixed down to stereo.
Load a sound onto a pad
There are two ways to put a file on a pad: choose it from a file browser, or drag it from Finder or Explorer.
From the file browser
- Right-click a pad. On touch, long-press it for about half a second. The pad context menu opens and that pad becomes selected. The right-click doesn't play the pad.
- Choose Load Sound....
- A file chooser titled Load sample to pad A1 (with your pad's name) opens in your Music folder. Pick a file.
- The LCD briefly shows Loaded to pad A1. If something goes wrong it shows Load failed: … with the reason.
Loading onto a pad that already holds a sound replaces it without asking. If that was a mistake, Undo brings the old sound back. Cancelling the chooser changes nothing. Load Sound... is greyed out on a pad that holds a plugin instrument.
Drag and drop Desktop
Dragging is the fastest way to fill a kit, because one drop can load many files.
- Drag one or more files from Finder or Explorer onto a pad. The pad highlights while you hover.
- Drop. The first file goes onto that pad.
- Any extra files fill the next empty pads, carrying on into later banks if needed. They never overwrite another pad that already has a sound.
The LCD reports how it went: Loaded to pad A1 for one file, Loaded 6 samples when everything loaded, Loaded 4/6 when some failed, and Load failed: … when none did. Files with extensions eSPi doesn't know are skipped, and dropping onto empty space does nothing.
You can also drag sounds from the Library panel onto pads, and they fill pads the same way. See Sample Library.
On iPad, iPhone and Android
On mobile there is no drag and drop from other apps. Load Sound... opens the system document picker instead. On iOS that means the Files app, iCloud Drive, On My iPad and providers such as Dropbox and Google Drive. On Android it is the system picker or a content provider. Video files work here too, and the audio is extracted on the device.
On iPad and iPhone, Load Sound... first asks where the sound comes from: Sample Library opens the Library panel, Files opens the document picker, and Videos opens the Photos app so you can pick a video; its audio is loaded onto the pad. Inside a DAW the Sample Library choice is not offered.
MP3 and video
MP3 files load exactly like WAV files. Video files load the same way too, but the audio is extracted in the background so the app stays responsive. The pad fills when extraction finishes. A video with no audio track, or with a codec eSPi can't read, shows Load failed: … and leaves the pad as it was.
Undoing a load
Replacing a sound on a pad is one Undo step (Cmd/Ctrl + Z), and so is replacing a plugin instrument with a sample. Loading onto an empty pad adds no Undo step, because nothing was lost. When you drop several files, each one that replaced a sound is its own step.
Sample from your input
This is the classic move: put a record on, set the level, and capture it straight onto a pad through the SP-1200's input stage. Everything lives in the Sample menu. Press Sample (R).
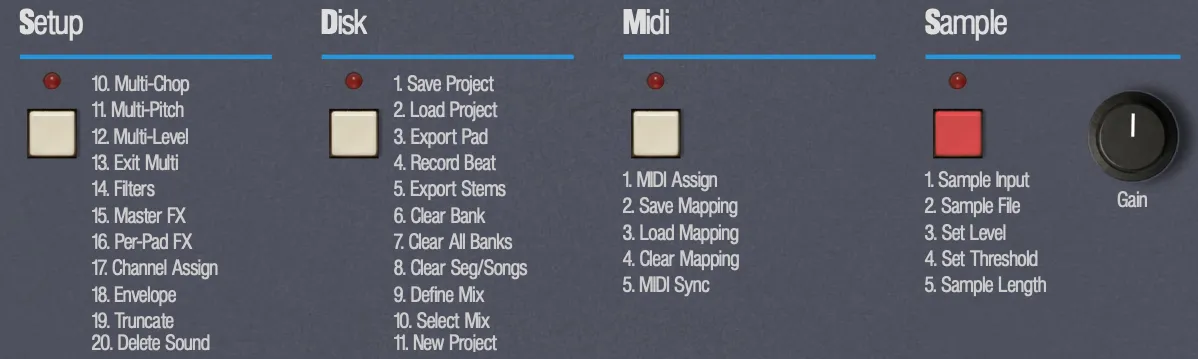
The Sample menu. Step through the items with ◄/► and press Enter, or type the item's number.
| # | LCD item | What it does |
|---|---|---|
| 1 | Sample from Input | Record from your audio interface or microphone. |
| 2 | Sample from File | Play a file through the sampler's input and record it. |
| 3 | Set Level | Boost the input gain. |
| 4 | Set Threshold | The level that starts an armed recording. |
| 5 | Sample Length | A fixed recording length, or Free. |
While you are sampling, typing 1–5 on the numpad jumps straight between these screens. Typing the number of the screen you are already on does nothing.
Record a take
- Select the pad you want to record onto.
- Press Sample (R) and choose 1, Sample from Input. This works in the Standalone app only. Inside a DAW the LCD says Standalone only, and with no usable input device it says No input device.
- The Select Pad screen confirms the target. Press another pad to change it. Press Enter or 9 (Yes) to go on, or 7 (No) to back out.
- On the record screen, play your source and watch the meter. Press Enter or 9 to start recording.
- Press Enter or 9 again to stop and keep the take.
The last line reads Overwrite? (yes/no) when the pad already holds a sound or an instrument, and Confirm? (yes/no) when it is empty.
The record screen. Line 2 is a live 20-segment meter from −60 dB on the left to 0 dB on the right. The last line names the input device.
While recording, line 3 changes to [ Enter = Stop ].
When you stop, the take goes through the SP-1200 input stage and lands on the pad. The pad flashes and the LCD reads Sample is good before returning to the main screen.
Keys on the record screen
- 8
- Input monitoring on or off. With it on, you hear the input through the SP-1200 input stage.
- ◄ / ►
- Previous or next input device.
- Enter or 9
- Start recording; press again to stop and keep the take.
- 7
- Arm or disarm threshold recording (below).
- Tempo
- Leave without recording.
Level, threshold and length
Three screens set up the sampler before you hit record. Get the level right first, then decide whether the take should start on its own and how long it should run.
Set the input level
The faceplate Gain knob, next to the Sample button, sets the base input level for live sampling. Fully left is silent, the centre is unity and fully right adds about 6 dB. Set Level then adds a stepped boost on top.
- Choose Sample 3, Set Level.
- Use ◄/► to step the boost through +00, +05, +10, +15 and +20 dB. You hear the change immediately, and the meter shows it.
- Press Enter to keep it, or Tempo to cancel and restore the previous boost.
The confirm line appears once you change the value. The boost goes back to +00 dB every time you start a new sampling session.
Start on a hit: threshold recording
Arming lets you start the turntable, get back to your seat, and let the first hit start the take.
- Choose Sample 4, Set Threshold.
- Move Fader 1 to place the | marker above the meter. Far left is about −60 dB, which triggers almost instantly; far right is 0 dB.
- Press 9 or Enter (Yes) to keep the new threshold, or 7 (No) or Tempo to restore the old one. Either way you return to the record screen.
- On the record screen, press 7 to arm. Recording starts by itself the moment the input crosses the marker.
- Press 7 again to disarm. You can't arm or disarm while a recording is running.
Left: setting the threshold. Before you touch the fader, line 2 reads | Use Fader #1. Right: armed and waiting, with the marker drawn on the meter.
The 30 ms of audio just before the trigger is kept, so the first transient is never clipped.
Set a fixed length
- Choose Sample 5, Sample Length.
- Move Fader 1. Fully down is Free: record until you press stop, up to 60 seconds. Anywhere else fixes the length between 0.1 and 60 seconds, with finer steps at short lengths. Mid-travel is about 2.4 seconds.
- Press 9 or Enter to keep it, or 7 or Tempo to revert.
Threshold and length are remembered between sampling sessions until you quit the app. The Set Level boost is not.
Sample from a file
Sample from File plays a file in a loop through the sampler's input, so you can catch exactly the slice you want, the same way you would from a record. It works in the standalone app and in a DAW.
- Choose Sample 2, Sample from File.
- Confirm the target on the Select Pad screen. A file chooser titled Sample from file to pad A1 opens.
- Pick a file. The Set Speed screen opens. Use ◄/► to choose how fast the file plays, the way a turntable speeds a record up or slows it down: pitch and tempo move together. The choices are 33rpm -16%, 33rpm -8%, 33rpm (the file's own speed, the default), 45rpm, 45rpm +8%, 45rpm +16% and 78rpm.
- Press Enter or 9 (Yes) to confirm, or 7 (No) to go back to Select Pad and pick another file. The file starts looping through the input at that speed, the meter moves, and the last line shows <File: name>.
- Record exactly as from live input: Enter to start and stop, or arm with 7 to start at the threshold. The take keeps the speed you chose.
45rpm plays about 1.35 times faster than 33rpm, 78rpm about 2.34 times. The ±8% and ±16% steps match the turntable's pitch fader.
On the record screen ◄/► do nothing, since there is no input device to switch. If the file can't be read, the LCD shows the error (for example Decode failed) and returns to Select Pad.
Trim with Truncate
Truncate is how you set where a sound starts and stops without leaving the faceplate. The faders become start, end and loop controls for the selected pad, and the LCD shows the exact sample positions.
- Select a pad that has a sample.
- Press Setup (Q). The LCD shows Set-up Function?.
- Go to item 19. The prompt reads Truncate Pad?.
- Answer Yes (Enter or 9).
The values are sample positions within the sound and update live as you move the faders. In Multi-Mode the label carries a star, as in Pad A1*.
Truncate lives only in the Setup menu. It isn't part of the Tune, Mix and Pan cycle on the mode button.
The faders in Truncate
The fader caps read START, START, END, END, LOOP, LOOP. Each point gets a coarse fader that sweeps the whole sample and a fine fader for the gaps in between.
- Start, coarse
- Start, fine
- End, coarse
- End, fine
- Loop, coarse (0 = off)
- Loop, fine
- Unused
- Unused
- Start and End can't cross. Each stops when it meets the other.
- A full sweep of fader 6 equals about 16 steps of fader 5. With both at zero the loop is off. With fader 5 at the top, fader 6 can push the loop right up to one sample before the end.
- Trigger the pad any time to hear the result. You stay in Truncate.
- With Zero-X on (the default), each point snaps to the nearest zero crossing about 100 ms after you let go of the fader, so the cut doesn't click. The switch is in the Waveform Editor, which shows the same start and end points.
- Select another pad and Truncate follows it.
- Fader moves can be undone.
Loops
With a loop point set, the pad plays from START to LOOP once, then repeats the LOOP–END section seven times. A smooth fade begins after the third repeat, and the sound stops at the end. Settings › Engine › Loop Repeats changes the count, from 1 to 16; the fade stretches or shrinks to match. The loop follows the pitch, so a pad tuned up loops faster.
Make it permanent
Trimming in Truncate is non-destructive: the whole sample is still there. When you are sure, cut it down for good.
- In Truncate, press Enter. While the question is on screen, the faders are frozen.
- Yes (Enter or 9) cuts the sample to the current START–END. The faders reset to full, because the new sample is that region. No (7) cancels.
Cmd/Ctrl + Z can't undo this cut, but eSPi saves a checkpoint first. You can get it back from Disk → 15 Undo History. See Projects & Export.
Quick edits from the pad menu
Right-click a pad (or long-press it for about half a second on touch) for the pad context menu. The sample edits here are one click away, without opening the editor. They are greyed out on an empty pad and on a pad holding a plugin instrument.
If eSPi knows the pad's key or tempo, the top of the menu shows Key: … and BPM: … chips; a * marks a value you set by hand. The rest of the menu (Audio Mode, Trigger Mode, Pitch, Channel, Mute, Solo, MIDI) is covered in Pads & Banks.
- Normalize Sound
- Raises the sample so its loudest point sits just below full scale (95%). eSPi asks first. Length and trim points don't change, and a playing note is cut. Normalizing again does nothing. Undoable.
- Reverse Sound
- Flips the sample at once, with no question. The LCD shows Reversed Pad A1. The same part of the sound stays selected, just backwards. Choose it again to restore the original (Pad A1 Restored). Undoable.
- Rename Pad...
- Opens the Rename Pad dialog. Names can be up to 64 characters of plain text.
- Edit Waveform...
- Opens the Waveform Editor on this pad.
- Resample Pad...
- Prints the pad's sound into a new sample. See Resample.
- Delete Sound
- Shown in red. eSPi asks first; Yes clears the pad and quickly fades out any note that is playing. Setup item 20, Delete Sound, does the same.
Yes is Enter or 9; No is 7.
Resample a pad
Resampling prints everything you have done to a pad into a fresh sample: the tuning, the filter, the envelope, the per-pad effects. It is how you commit a sound before you move on, and the pad is left clean for the next round of shaping.
- Right-click (or long-press) a loaded pad and choose Resample Pad....
- Confirm with Enter or 9, or back out with 7.
- eSPi renders the sound in the background while a spinner shows on the pad. When it's done the status reads Resampled Pad A1; if it fails, Resample failed.
| Printed into the sample | Then reset on the pad |
|---|---|
| Pitch (Tune) and Fine Pitch | Pitch 0, 0 cents |
| Turntable speed and pitch | Deck back to 33, pitch 0.00% |
| Start, end and loop | Full start and end, loop off |
| Audio Mode | Stereo |
| SSM2044 filter, SP Channel filter and Multi filter | All three bypassed |
| Amplitude envelope | A flat envelope |
| Per-pad effects, including hosted plugins | Effect chain cleared |
| Up to 10 seconds of tail after the sample ends | Chops, cue points, BPM and key cleared (BPM and key are detected again later) |
The reset means nothing is applied twice, and the faders move to match. What is not printed stays live on the pad: velocity, volume (Mix), pan and the master effects.
One Undo (Cmd/Ctrl + Z, or Undo in the editor) restores the original sample and every setting in the table. If the Waveform Editor is open on that pad, its waveform updates straight away. A pad that is still rendering can't be resampled again until it finishes.